This guide walks you through every screen in ProtocolHQ — what it does,
how to use it, and the fastest path from setup to your first workout assigned.
1
Build your exercise library
2
Create your first workout
3
Assign it to a player
4
Track completion in real time
Coach Dashboard
The web interface — your full command centre.
1
Exercise Library
Your personal database of exercises — browse, search, and build from here.
What you can do here
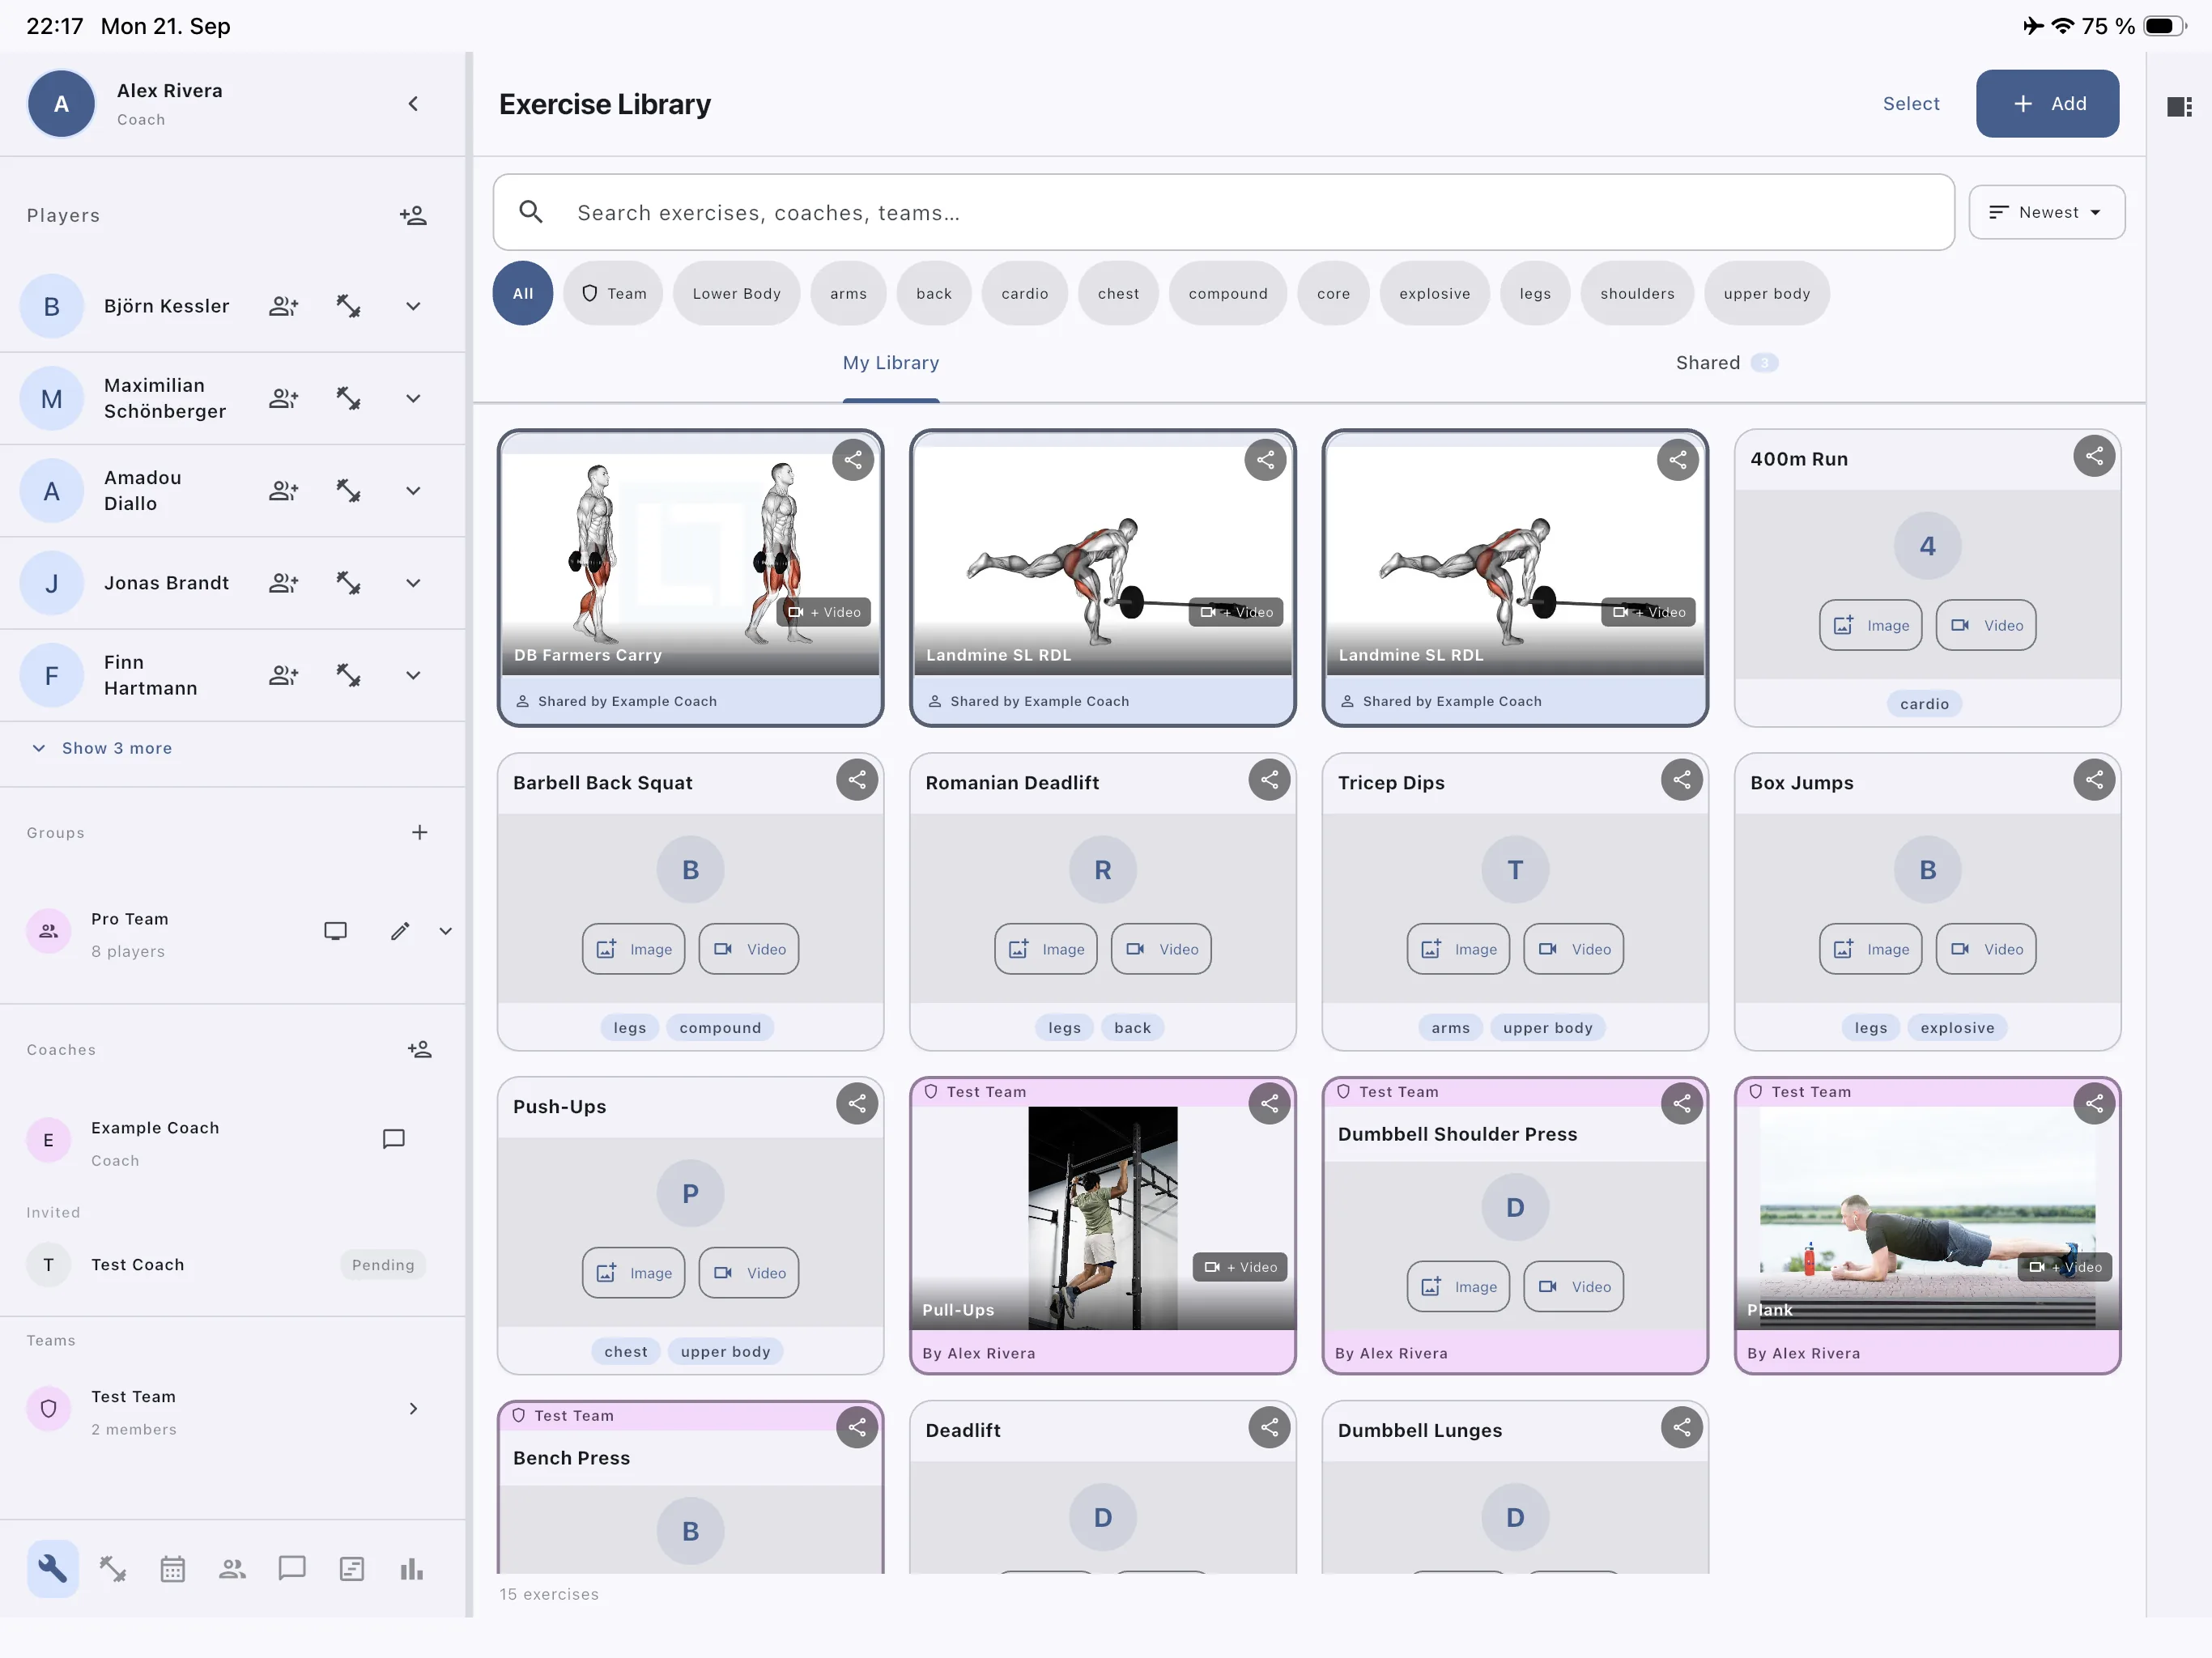
Browse and search your full exercise library by name, category, muscle group, coach name, or team name
Add new exercises with images or video demo attachments
Switch between My Library (your own + team exercises) and Shared (exercises sent to you by connected coaches)
Use the permanent Team filter chip to instantly see all exercises shared with your teams — each team exercise shows a coloured badge with the team name and creator
Select multiple exercises and bulk-share with connected coaches or entire teams at once
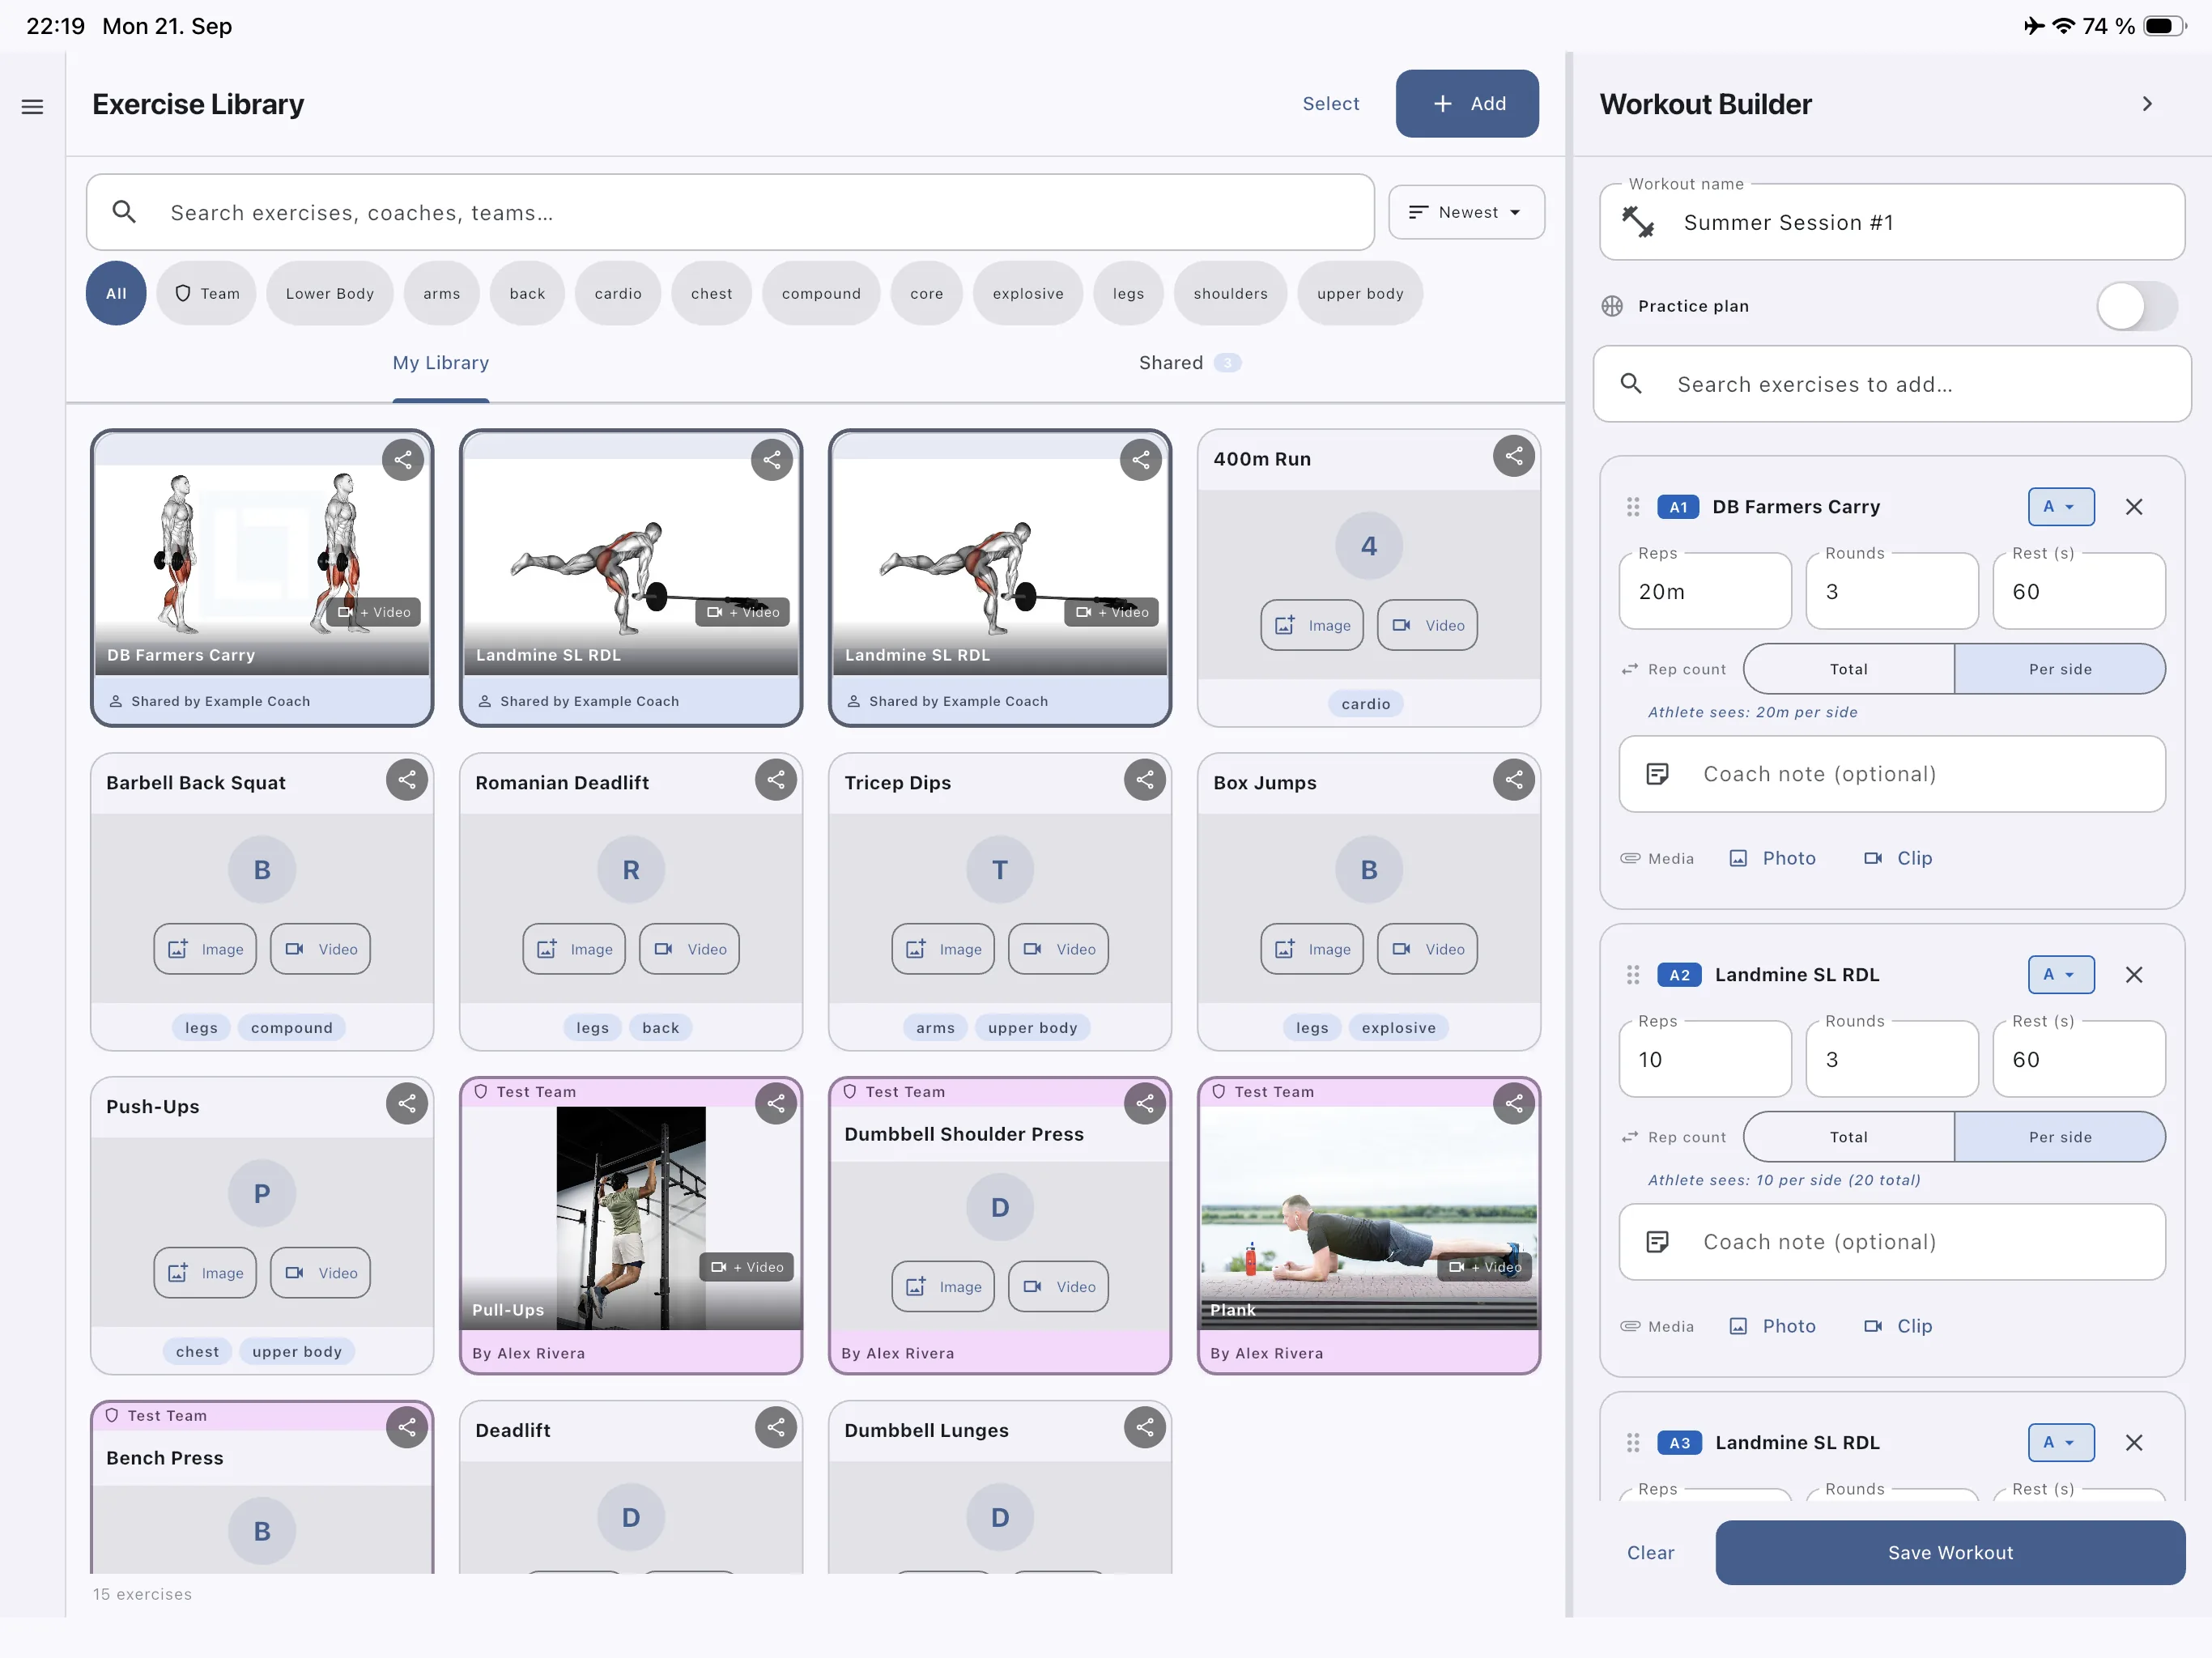
Open the Workout Builder panel side-by-side to drag exercises directly into a new workout
Step-by-step
1
Open the Exercise LibraryClick the Library icon in the left navigation panel. Your exercises appear as cards, including any shared with your teams.
2
Add a new exerciseTap the + Add button (top right). Enter the exercise name, select a category, add sets/reps defaults, upload a demo image or video, and optionally share with one of your teams immediately.
3
Search and filterThe search bar matches exercise names, notes, tags, coach names, and team names. Use the category chips for muscle group filtering, or tap the Team chip to see only team-shared exercises.
4
Bulk share with your teamTap Select in the header, pick multiple exercises, then tap Share. The dialog lets you share with individual connected coaches or entire teams in one action.
5
Start buildingClick any exercise card to open it and edit details, or open the Workout Builder panel on the right to start assembling a session.
💡
Tip: Build your exercise library first — even a basic set of 20–30 exercises makes workout creation much faster. Team exercises from connected coaches appear right alongside your own, so you start with a richer pool.
2
Workout Builder
Assemble structured sessions from your exercise library — exercise by exercise.
What you can do here
Name the workout and set an optional scheduled date
Add exercises from the library with a single tap
Set sets, reps, tempo, rest time, and RPE target per exercise
Add coaching notes to individual exercises or the whole workout
Organise exercises into blocks (Block A, Block B…)
Step-by-step
1
Open the Builder panelClick the Builder icon in the nav panel, or tap the arrow icon from within the Exercise Library to open both side-by-side.
2
Name your workoutType a name in the Workout name field at the top of the builder panel (e.g. "Preseason Day 1" or "Recovery Session").
3
Add exercisesUse the Search exercises to add… field or click an exercise card in the library. Tap an exercise to add it to the workout.
4
Configure each exerciseTap the added exercise to expand it. Set sets, reps, tempo, rest seconds, and an RPE target. Add a coaching note if needed.
5
Save the workoutTap Save Workout at the bottom. It now appears in your Workout Library, ready to assign to any player.
💡
Tip: Build workouts in advance and save them as templates. You can reuse the same workout across multiple players and weeks without rebuilding it each time.
3
Workout Library
All your saved workouts in one place — ready to assign, share, or duplicate.
What you can do here
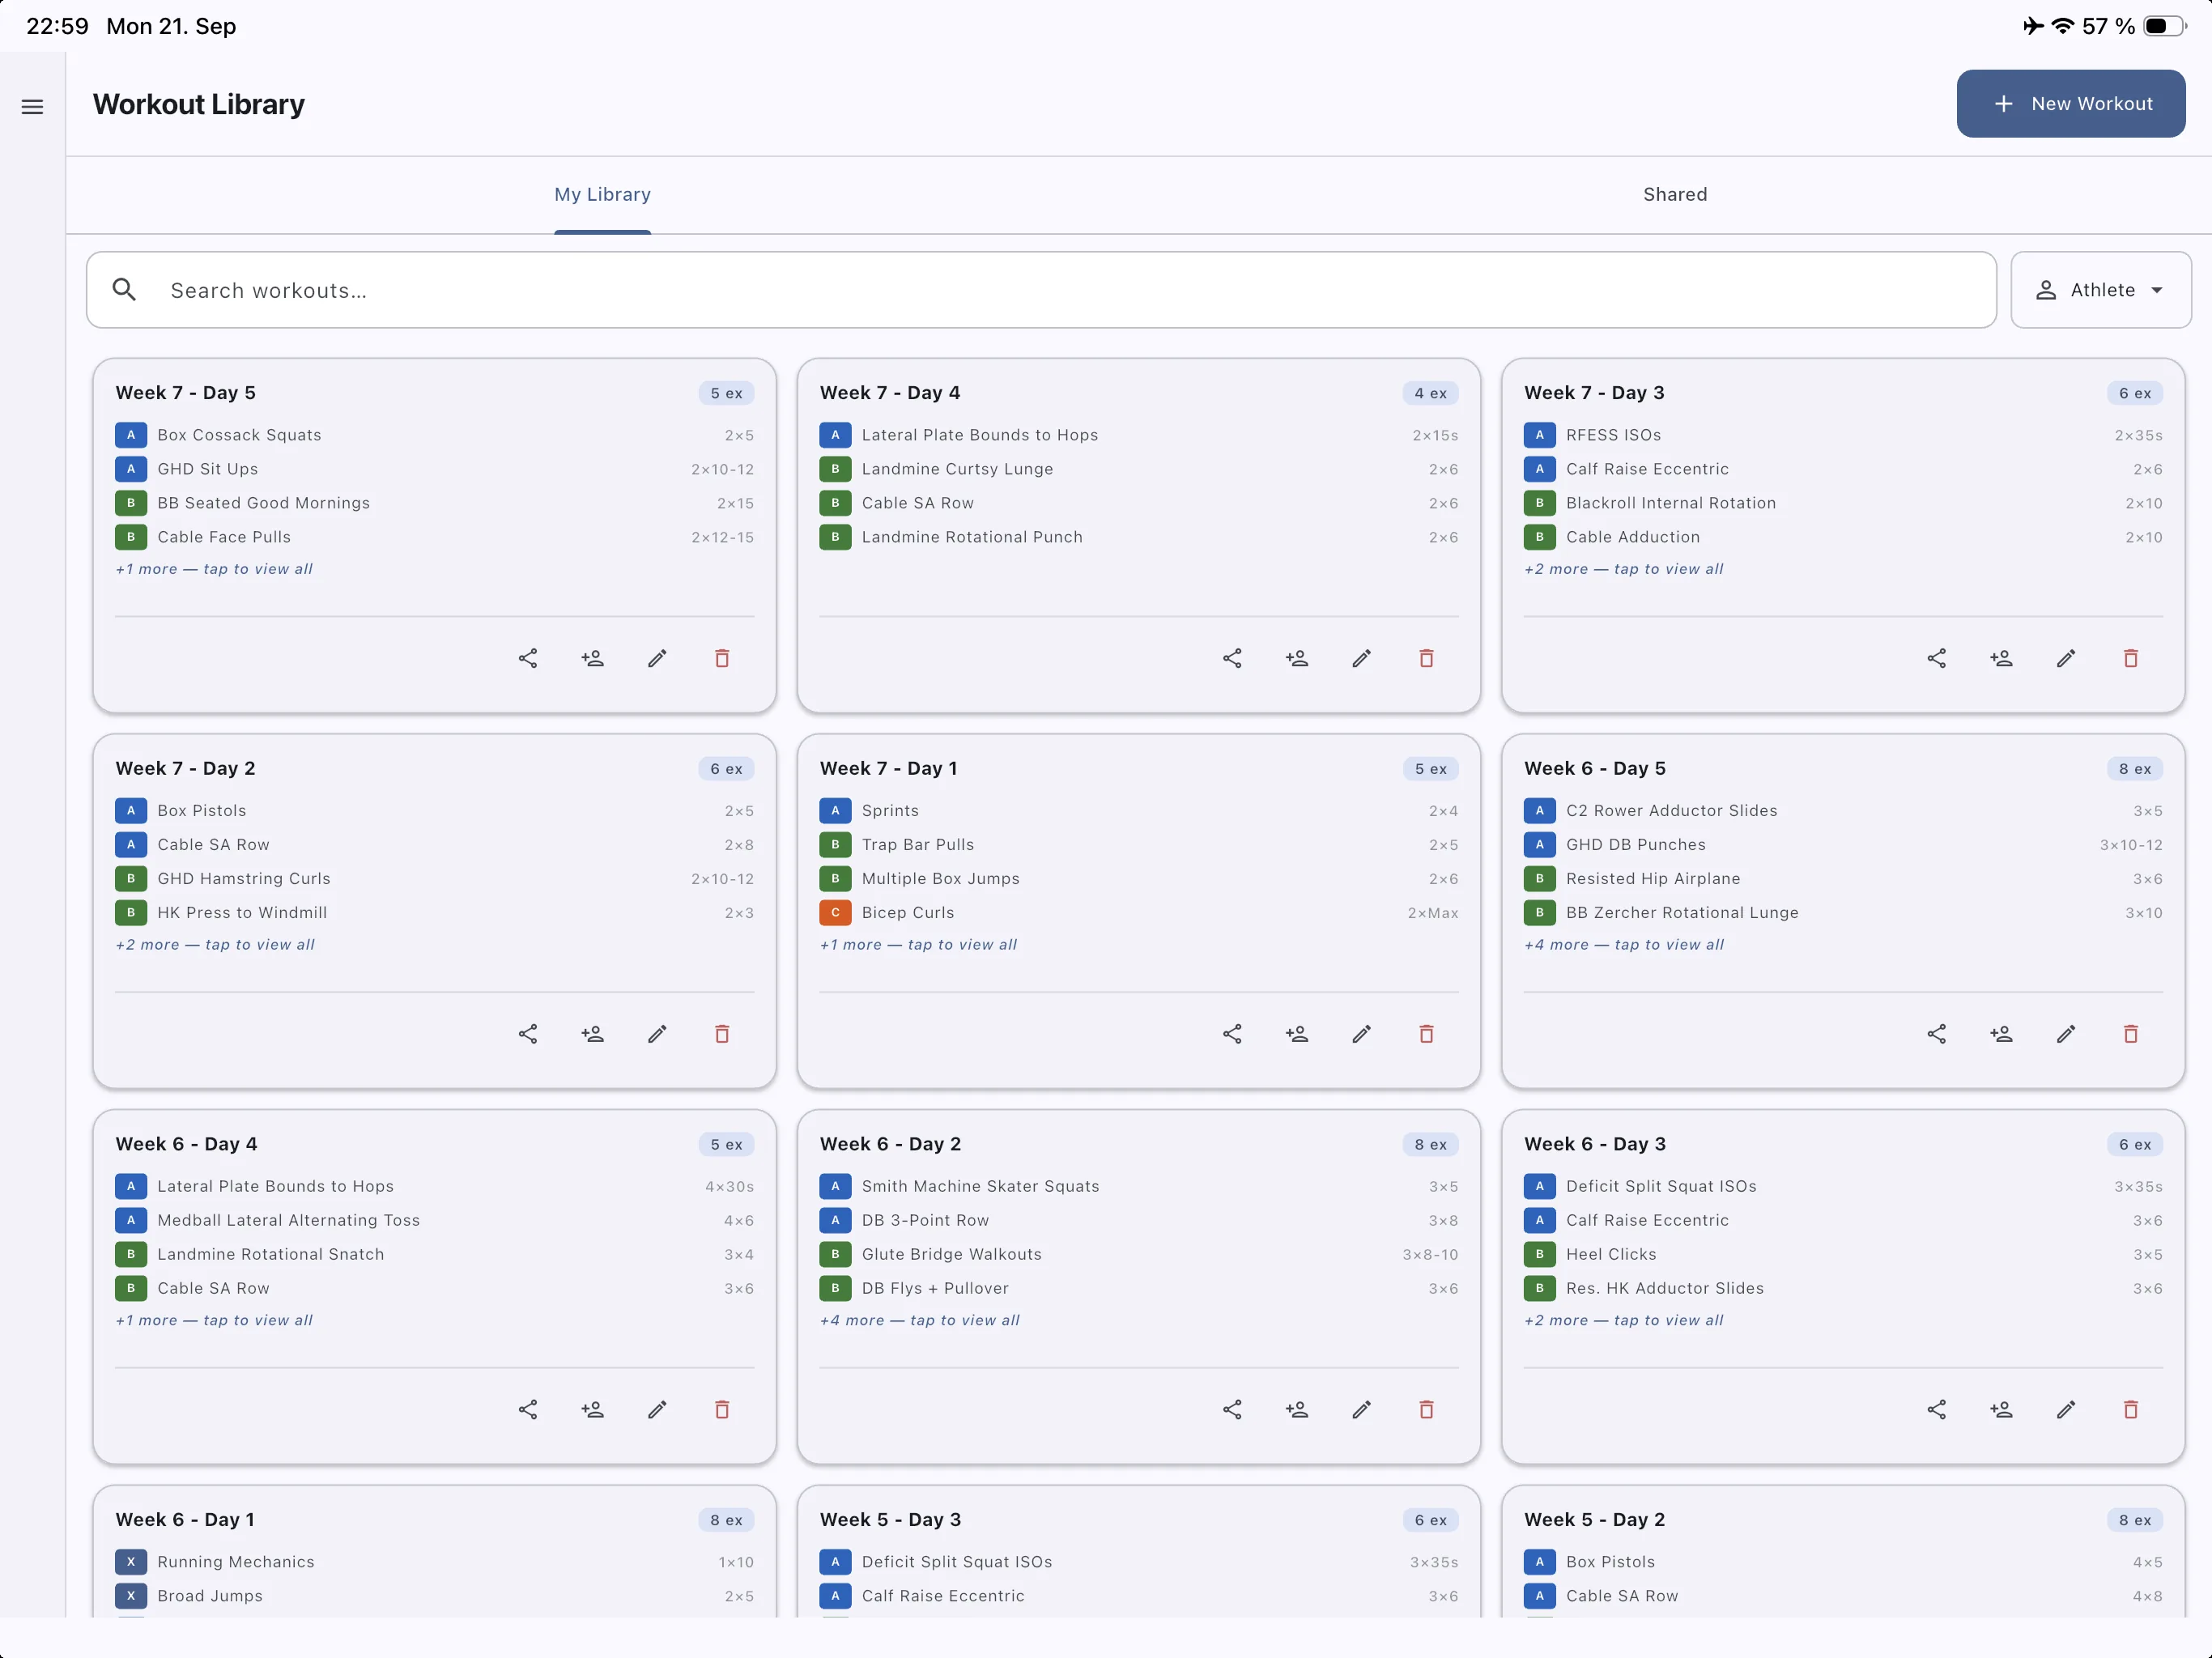
See all saved workouts with their exercise list at a glance
Assign a workout to a player or group directly from the library card
Share workouts with connected coaches so they can use them in their own library
Edit an existing workout without affecting already-assigned sessions
Step-by-step
1
Find a workoutScroll through your library or use the search bar at the top. Each card shows the workout name, total duration estimate, and a preview of exercises.
2
Assign to a playerClick the assign icon (person+) on a workout card. Select a player or group and a scheduled date. The workout immediately appears in the player's app.
3
Share with a coachTap the share icon on the card. Select a connected coach from the list. The workout is added directly to their library.
4
Edit or deleteUse the pencil (edit) or trash (delete) icons on each card. Edits only affect future assignments — already-completed sessions remain unchanged.
💡
Tip: Use the Shared tab to browse workouts that connected coaches have shared with you. Great for building variety without starting from scratch.
4
Week Planner
Plan and assign the entire week's training in a single calendar view.
What you can do here
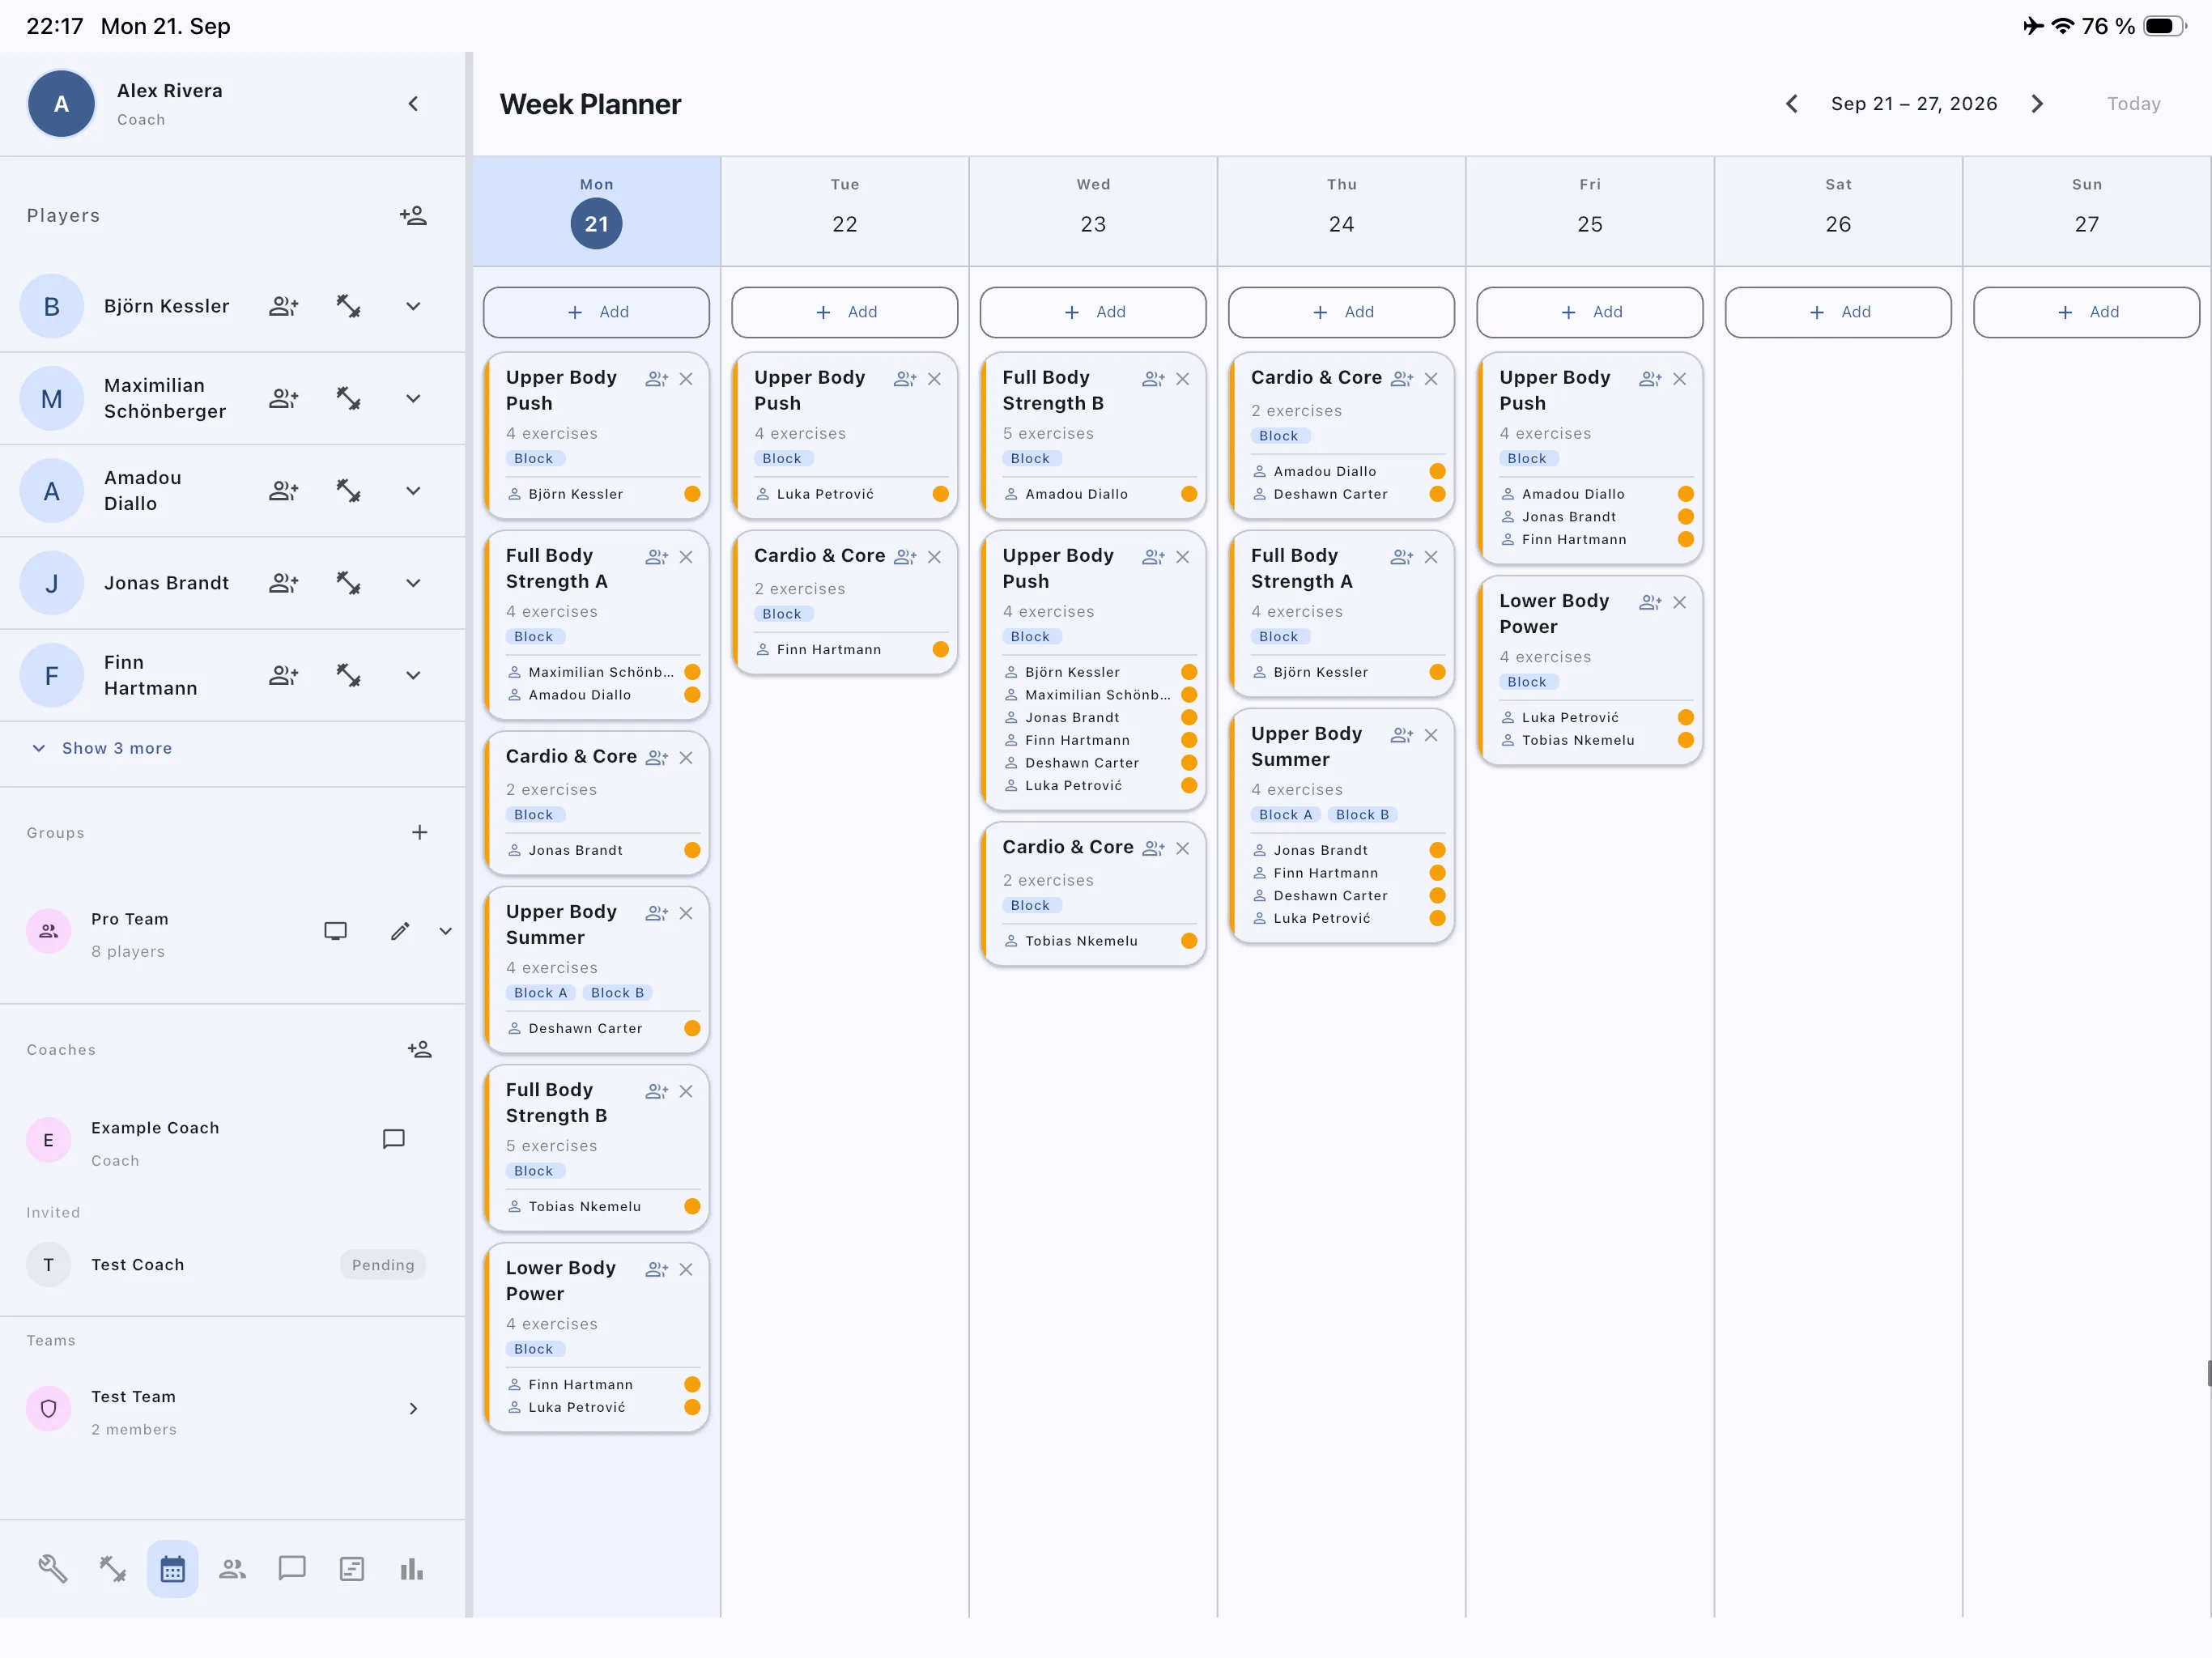
View the full Mon–Sun week with all assigned workouts
Assign workouts to players or groups directly from each day column
Color-coded left border on each workout card — green = completed, amber = pending, red = skipped
Each card shows which players are assigned and their individual completion status
Navigate forwards and backwards through weeks using the arrow buttons
Quickly identify overloaded or empty days before the week begins
Step-by-step
1
Open the PlannerClick the calendar icon in the nav panel. The current week is shown by default with today's column highlighted.
2
Add a workout to a dayClick + Add in any day column. A dialog opens where you select the workout, then choose one or more players or a group to assign it to.
3
Review the assignmentEach assigned workout appears as a card in the day column with player name chips attached. Expand any card to see the exercise list.
4
Reassign or removeClick the edit icon on any workout card to change the assignment, or the X to remove it. Changes sync to the player's app immediately.
💡
Tip: Use group assignments to assign the same workout to your whole squad at once — select the group name when the assign dialog appears instead of picking individual players.
5
Training Programs
Build multi-week training blocks and assign them to players or groups with one action.
What you can do here
Create a named program (e.g. "Preseason Block", "Off-season Strength") with a 4, 8, or 12-week duration
Drag workouts from your library onto a week/day grid to build the full schedule
Assign the program to a player or entire group with a start date — ProtocolHQ automatically calculates and schedules every session
Track program progress per player — weeks completed and compliance percentage
Reuse the same program across multiple athletes or cohorts
Step-by-step
1
Open ProgramsClick the Programs icon in the left nav panel. Your saved programs are listed on the left; the builder grid appears on the right.
2
Create a new programClick + New Program. Enter a name, description, and select the duration (4, 8, or 12 weeks). The weekly grid expands accordingly.
3
Add workouts to the gridEach row is a week, each column is a day (Mon–Sun). Click any cell and choose a workout from your library to place it on that week/day slot.
4
Assign the programClick Assign Program. Select one or more players (or a group) and set a start date. ProtocolHQ creates all workout assignments automatically with the correct scheduled dates.
💡
Tip: Build your core program templates once — "Preseason 8-week", "In-season maintenance", "Offseason strength" — then assign them each time with a new start date. No rebuilding required.
6
Messaging
Direct communication between coaches and athletes — no extra app needed.
What you can do here
Message any athlete directly from the coach dashboard — a split-pane chat interface opens on the right
Athletes reply from the Messages tab in their mobile app — no need to switch to a separate chat tool
Coach-to-coach messaging — message any connected coach or team member directly; conversations appear alongside athlete chats in the same panel
Start a coach conversation instantly from the Teams section in the left nav — tap the message icon next to any team member
Conversations are real-time and persist across sessions
Unread message badges appear on the nav panel so nothing gets missed
Messaging an athlete
1
Open MessagesClick the Messages icon in the left nav panel. Your active conversations — both athlete and coach — are listed on the left side of the panel.
2
Start a new conversationClick the pencil icon (top right of the panel) and select a player or connected coach. A new thread opens in the right pane.
3
Type and sendType your message in the input field at the bottom and press Enter or the send button. The recipient receives a push notification immediately.
Messaging a coach from your team
1
Open the Teams sectionIn the left nav panel, scroll to the Teams section. Click on any team to see its members.
2
Tap the message iconNext to any team member's name, tap the chat bubble icon. The app switches to the Messages view with that coach's conversation open and ready.
💡
Tip: Use messaging to check in with athletes who have low compliance flagged in Analytics. A short personal message is often all it takes to re-engage someone who has fallen off.
7
Coach Teams
Collaborate with other coaches — share exercises, invite team members, and message each other directly.
What you can do here
See all the coach teams you belong to in the Teams section of the left nav panel
Click any team to open a member list — see each coach's name, email, and connection status
Send a connection invite to any team member directly from the member list
Message any team member instantly — tap the chat icon to open a direct conversation in the Messages view
Share exercises with an entire team at once — team exercises show a coloured badge (team name at top, creator at bottom) in your library
Filter your exercise library by the Team chip to see only team-shared exercises at a glance
Connected coaches appear in the Coaches section of the nav panel; pending outgoing invites are shown below as "Invited"
Sharing an exercise with your team
1
Open the Exercise LibraryClick the Library icon. In the left nav, your Teams section shows all teams you belong to.
2
Select exercises to shareTap Select in the header, then tap each exercise card you want to share. A blue outline and checkmark confirms selection.
3
Open the Share dialogTap Share in the selection action bar. The dialog shows two sections: Share with Team (your teams) and Share with Coach (individual connected coaches).
4
Select teams and confirmCheck one or more teams (or individual coaches) and tap Share. All team members receive the exercises in their library immediately, with a team badge on each card.
Connecting with a coach
1
Find them in your teamOpen a team in the Teams section. Each member row shows their name, email, and a Connect button if you aren't connected yet.
2
Send the inviteTap Connect. The coach appears under Invited in your Coaches section until they accept. Once accepted, you can share exercises and message each other directly.
💡
Tip: Teams are created and managed by the platform admin. Once you're added to a team, all members are visible immediately. Use the Team filter chip in the exercise library to quickly see what your colleagues have shared — it's a fast way to build variety into your programming.
8
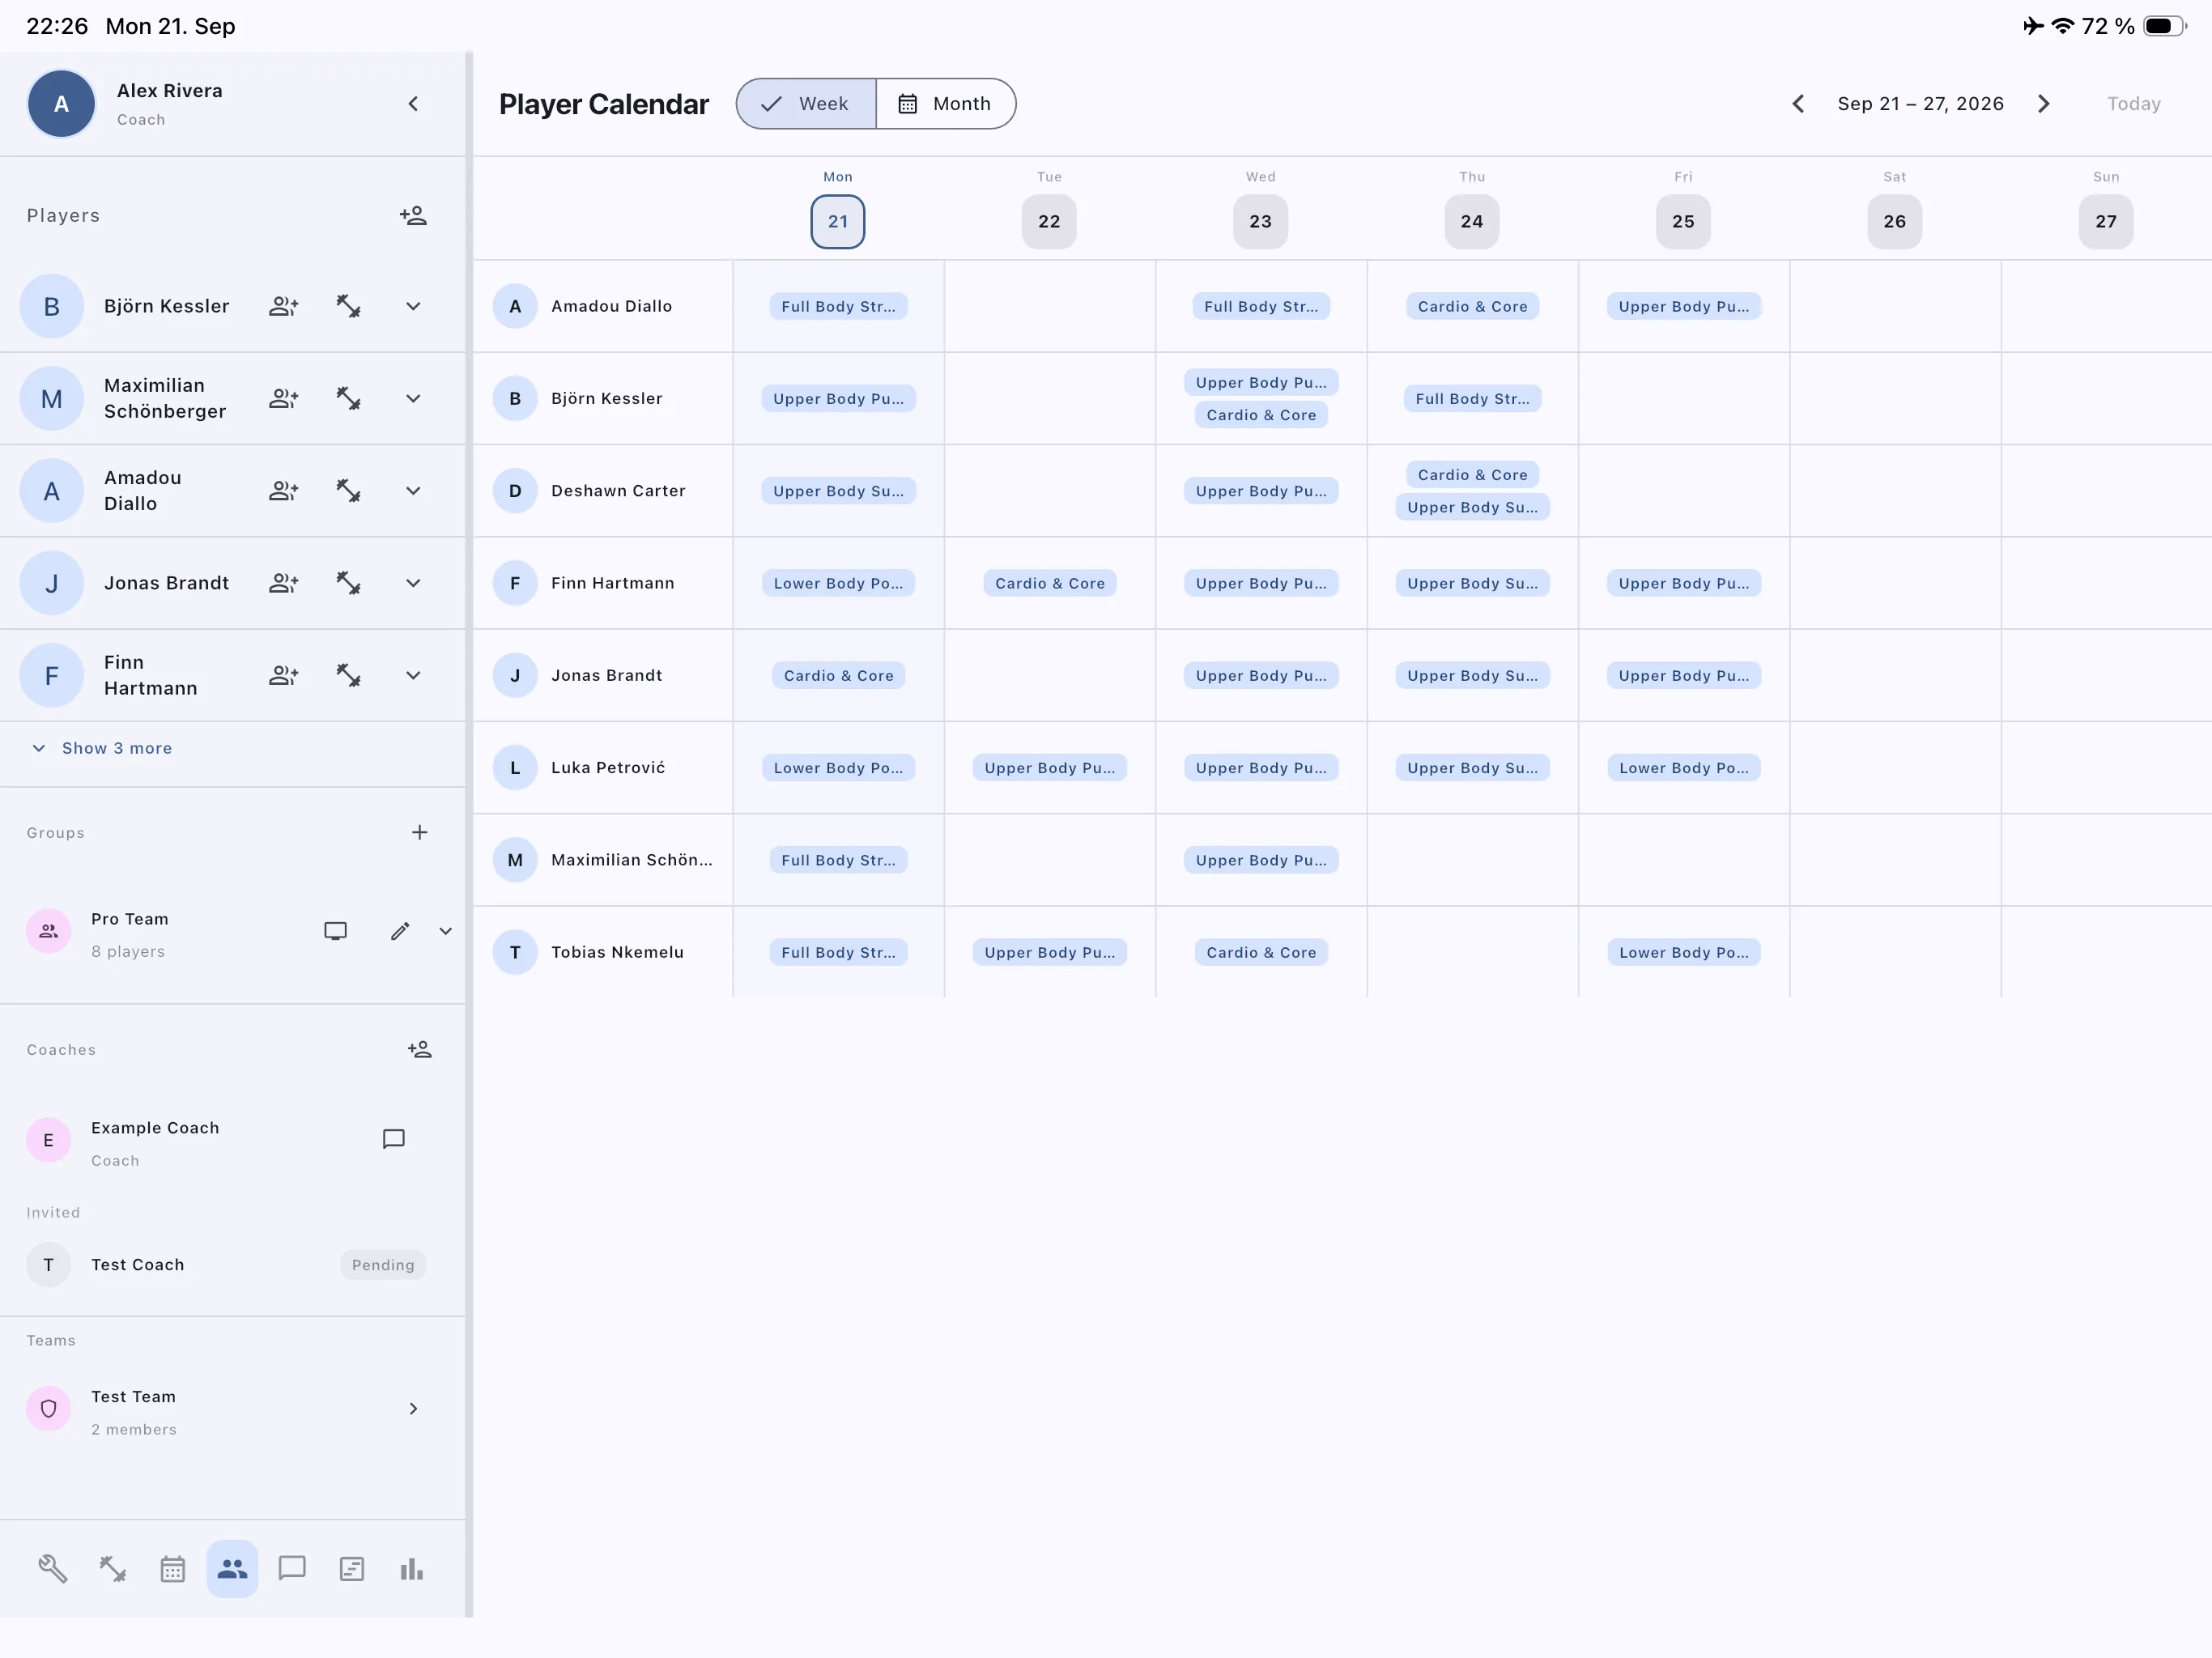
Player Calendar
See every athlete's full schedule — week view for daily detail, month view for the big picture.
What you can do here
Switch between Week View and Month View using the toggle at the top
In Week View, see each player as a row with colour-coded workout chips for each day
In Month View, select any date to see a full list of all player assignments for that day
Navigate between weeks or months using the arrow controls
Instantly spot players with too many sessions or gaps in their schedule
Week View — how it works
1
Read the row layoutEach row = one player. Each column = one day of the week. Chips show the workout name — green for completed, red/pink for skipped, teal for pending.
2
Click a workout chipTapping a chip opens the assignment detail — you can see the workout content, completion status, and logged RPE if the athlete has finished it.
Month View — how it works
3
Tap a dateThe bottom panel expands to list all players and their assigned workout for that day. Dots on the calendar indicate days with scheduled sessions.
4
Check completion badgesEach player row in the day list shows a colour badge — Completed (green), Skipped (red), or Pending (grey).
💡
Tip: Use Month View at the start of each week to review the past week's completions across your whole squad before planning the next one.
9
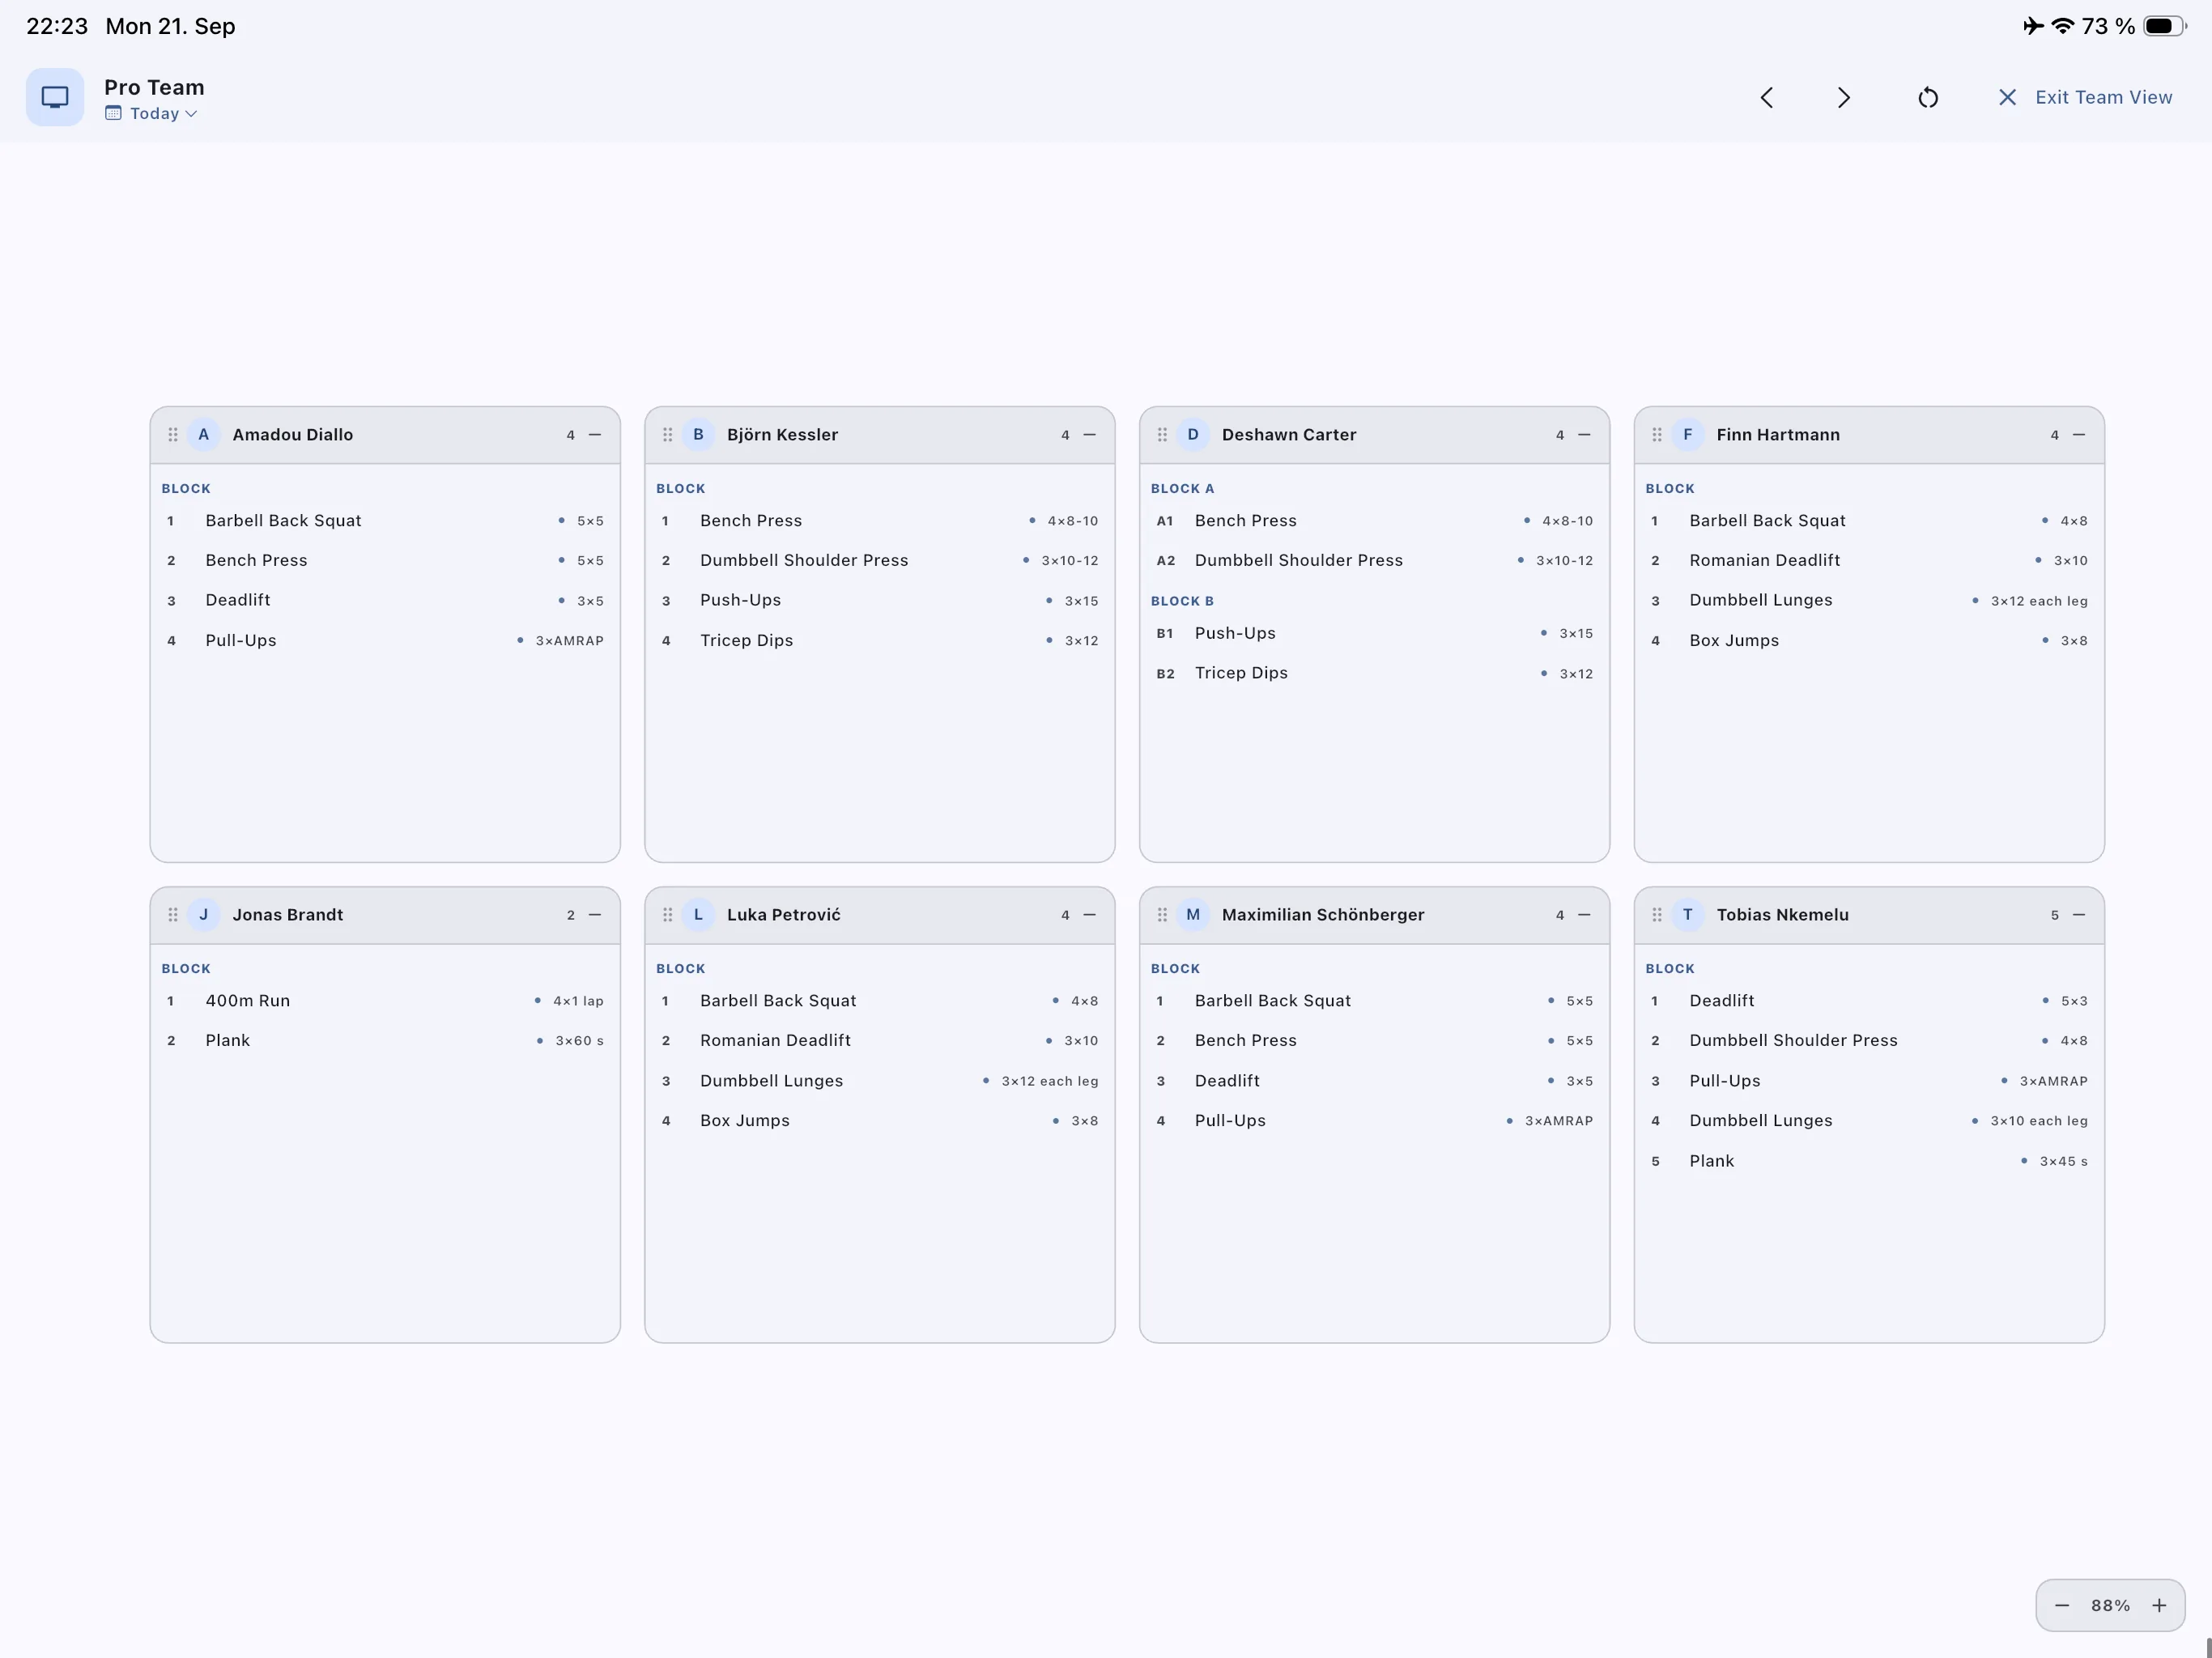
Live Team View
Your whole squad on one board — every athlete's session side by side, live.
What you can do here
Open your whole squad on one board — every athlete gets their own card showing today's session
Drag any card by its header to rearrange the board, or resize from the corner to focus on specific athletes
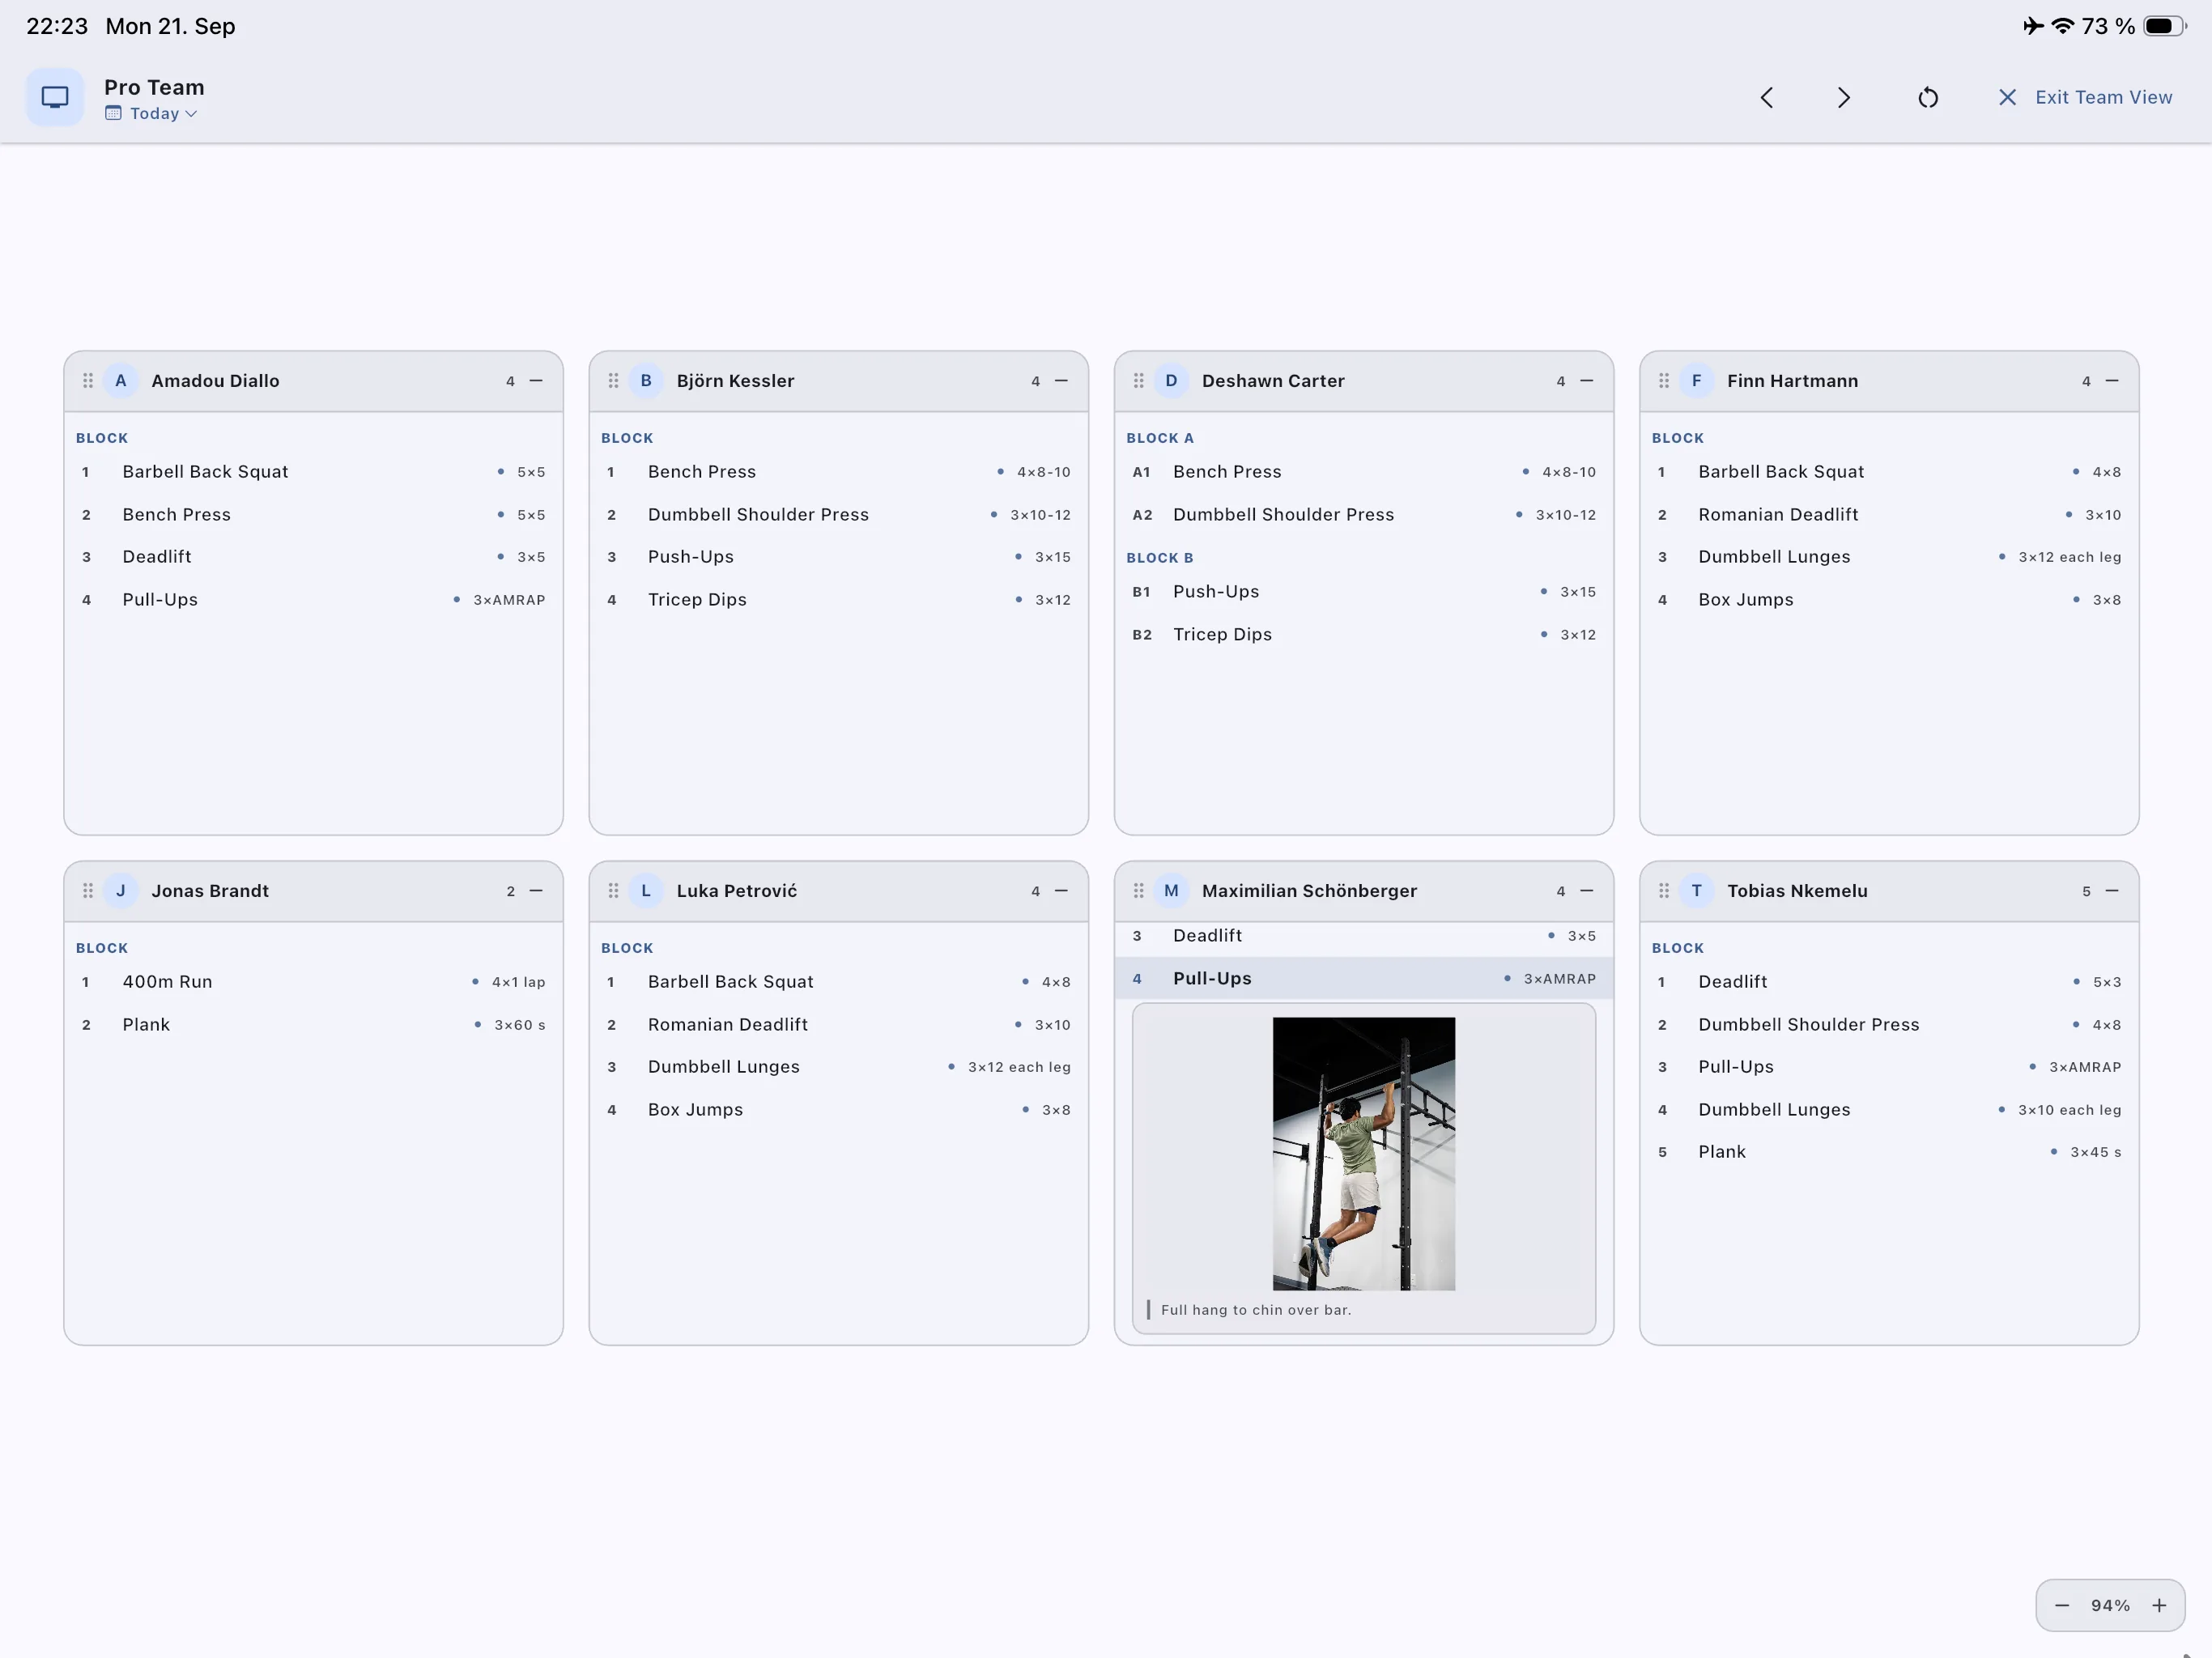
Tap any exercise row inside a card to open its coaching note or demo photo inline, without leaving the board
Reset the board back to the default grid layout with one click
Step forward and backward through days using the arrow controls at the top
Step-by-step
1
Open Team ViewClick the monitor icon next to a group in the left nav panel. The board opens showing every player in that group as a card.
2
Arrange the boardDrag any card by its header to reposition it, or drag the corner handle to resize it — useful for zooming in on one athlete during a session.
3
Check an exercise's mediaTap any exercise row inside a card. If it has a demo photo or coaching note attached, it expands right there in the card.
4
Reset when neededClick the reset icon in the top bar to snap every card back to the default grid layout.
💡
Tip: Use Live Team View during an in-person session — cast it to a TV or big screen so the whole squad can see their card at a glance while you coach.
10
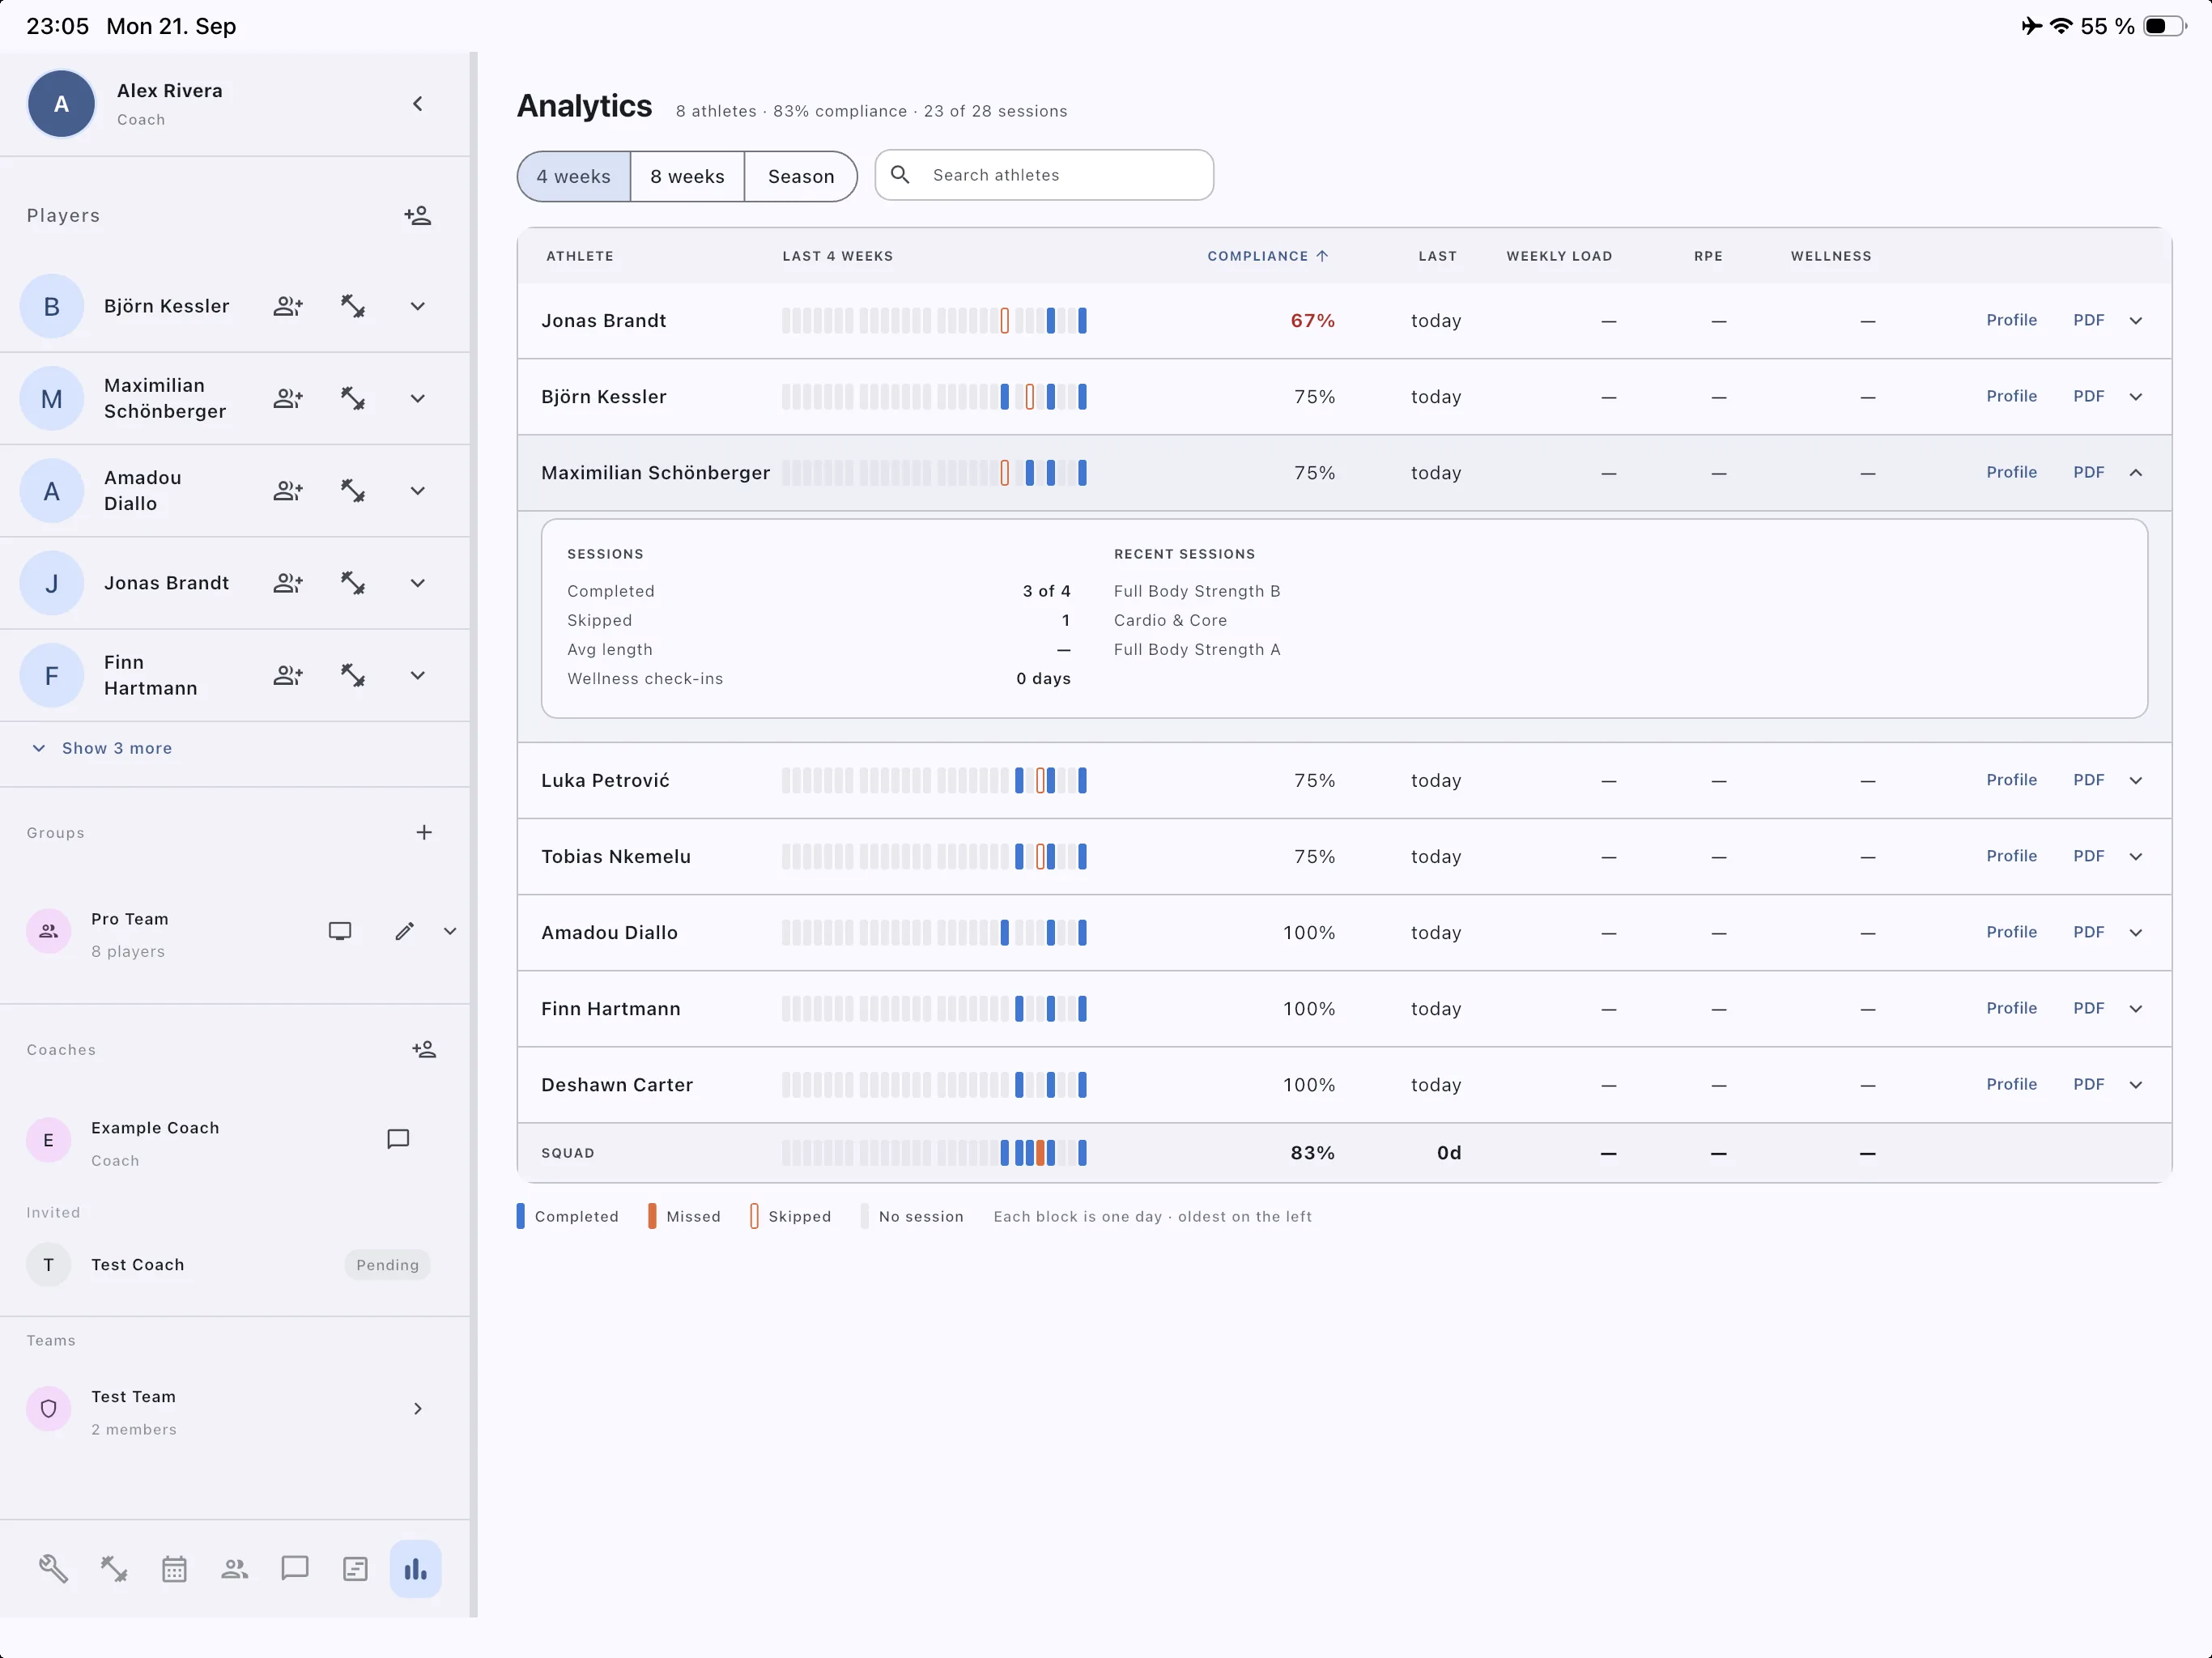
Team Analytics
Your whole squad as one sortable table — compliance, load, RPE, and wellness at a glance.
What you can do here
See every athlete in one table — session history blocks, compliance %, last session date, weekly load, RPE, and wellness
Switch the reporting window between 4 weeks, 8 weeks, and Season
Sort the whole squad by any column — click Compliance to surface who needs attention first
Search athletes directly from the table header
Expand any row for a quick breakdown — sessions completed/skipped, average length, wellness check-ins, and recent session names
Jump to a full Profile or export a PDF report directly from the row
A Squad summary row at the bottom rolls up compliance across the whole team
Reading the table
1
Last N weeks stripEach block is one day, oldest on the left. Blue = completed, red = missed, hollow red = skipped, grey = no session — a quick visual read on consistency.
2
Sort by complianceClick the Compliance column header to sort the table — toggle ascending to put the athletes who need attention at the top.
3
Expand a rowClick the chevron on any athlete's row to open a details panel with completed/skipped counts, average session length, wellness check-in count, and their most recent sessions.
4
Export or open a profileUse the Profile link to open that athlete's full profile, or PDF to generate their training report directly from the table row.
💡
Tip: Sort by Compliance at the start of every week. Any athlete below 60% is worth a quick message or a check-in to understand what's blocking them.
11
Player Profiles
A full picture of any individual athlete — history, wellness, notes, and more.
What you can do here
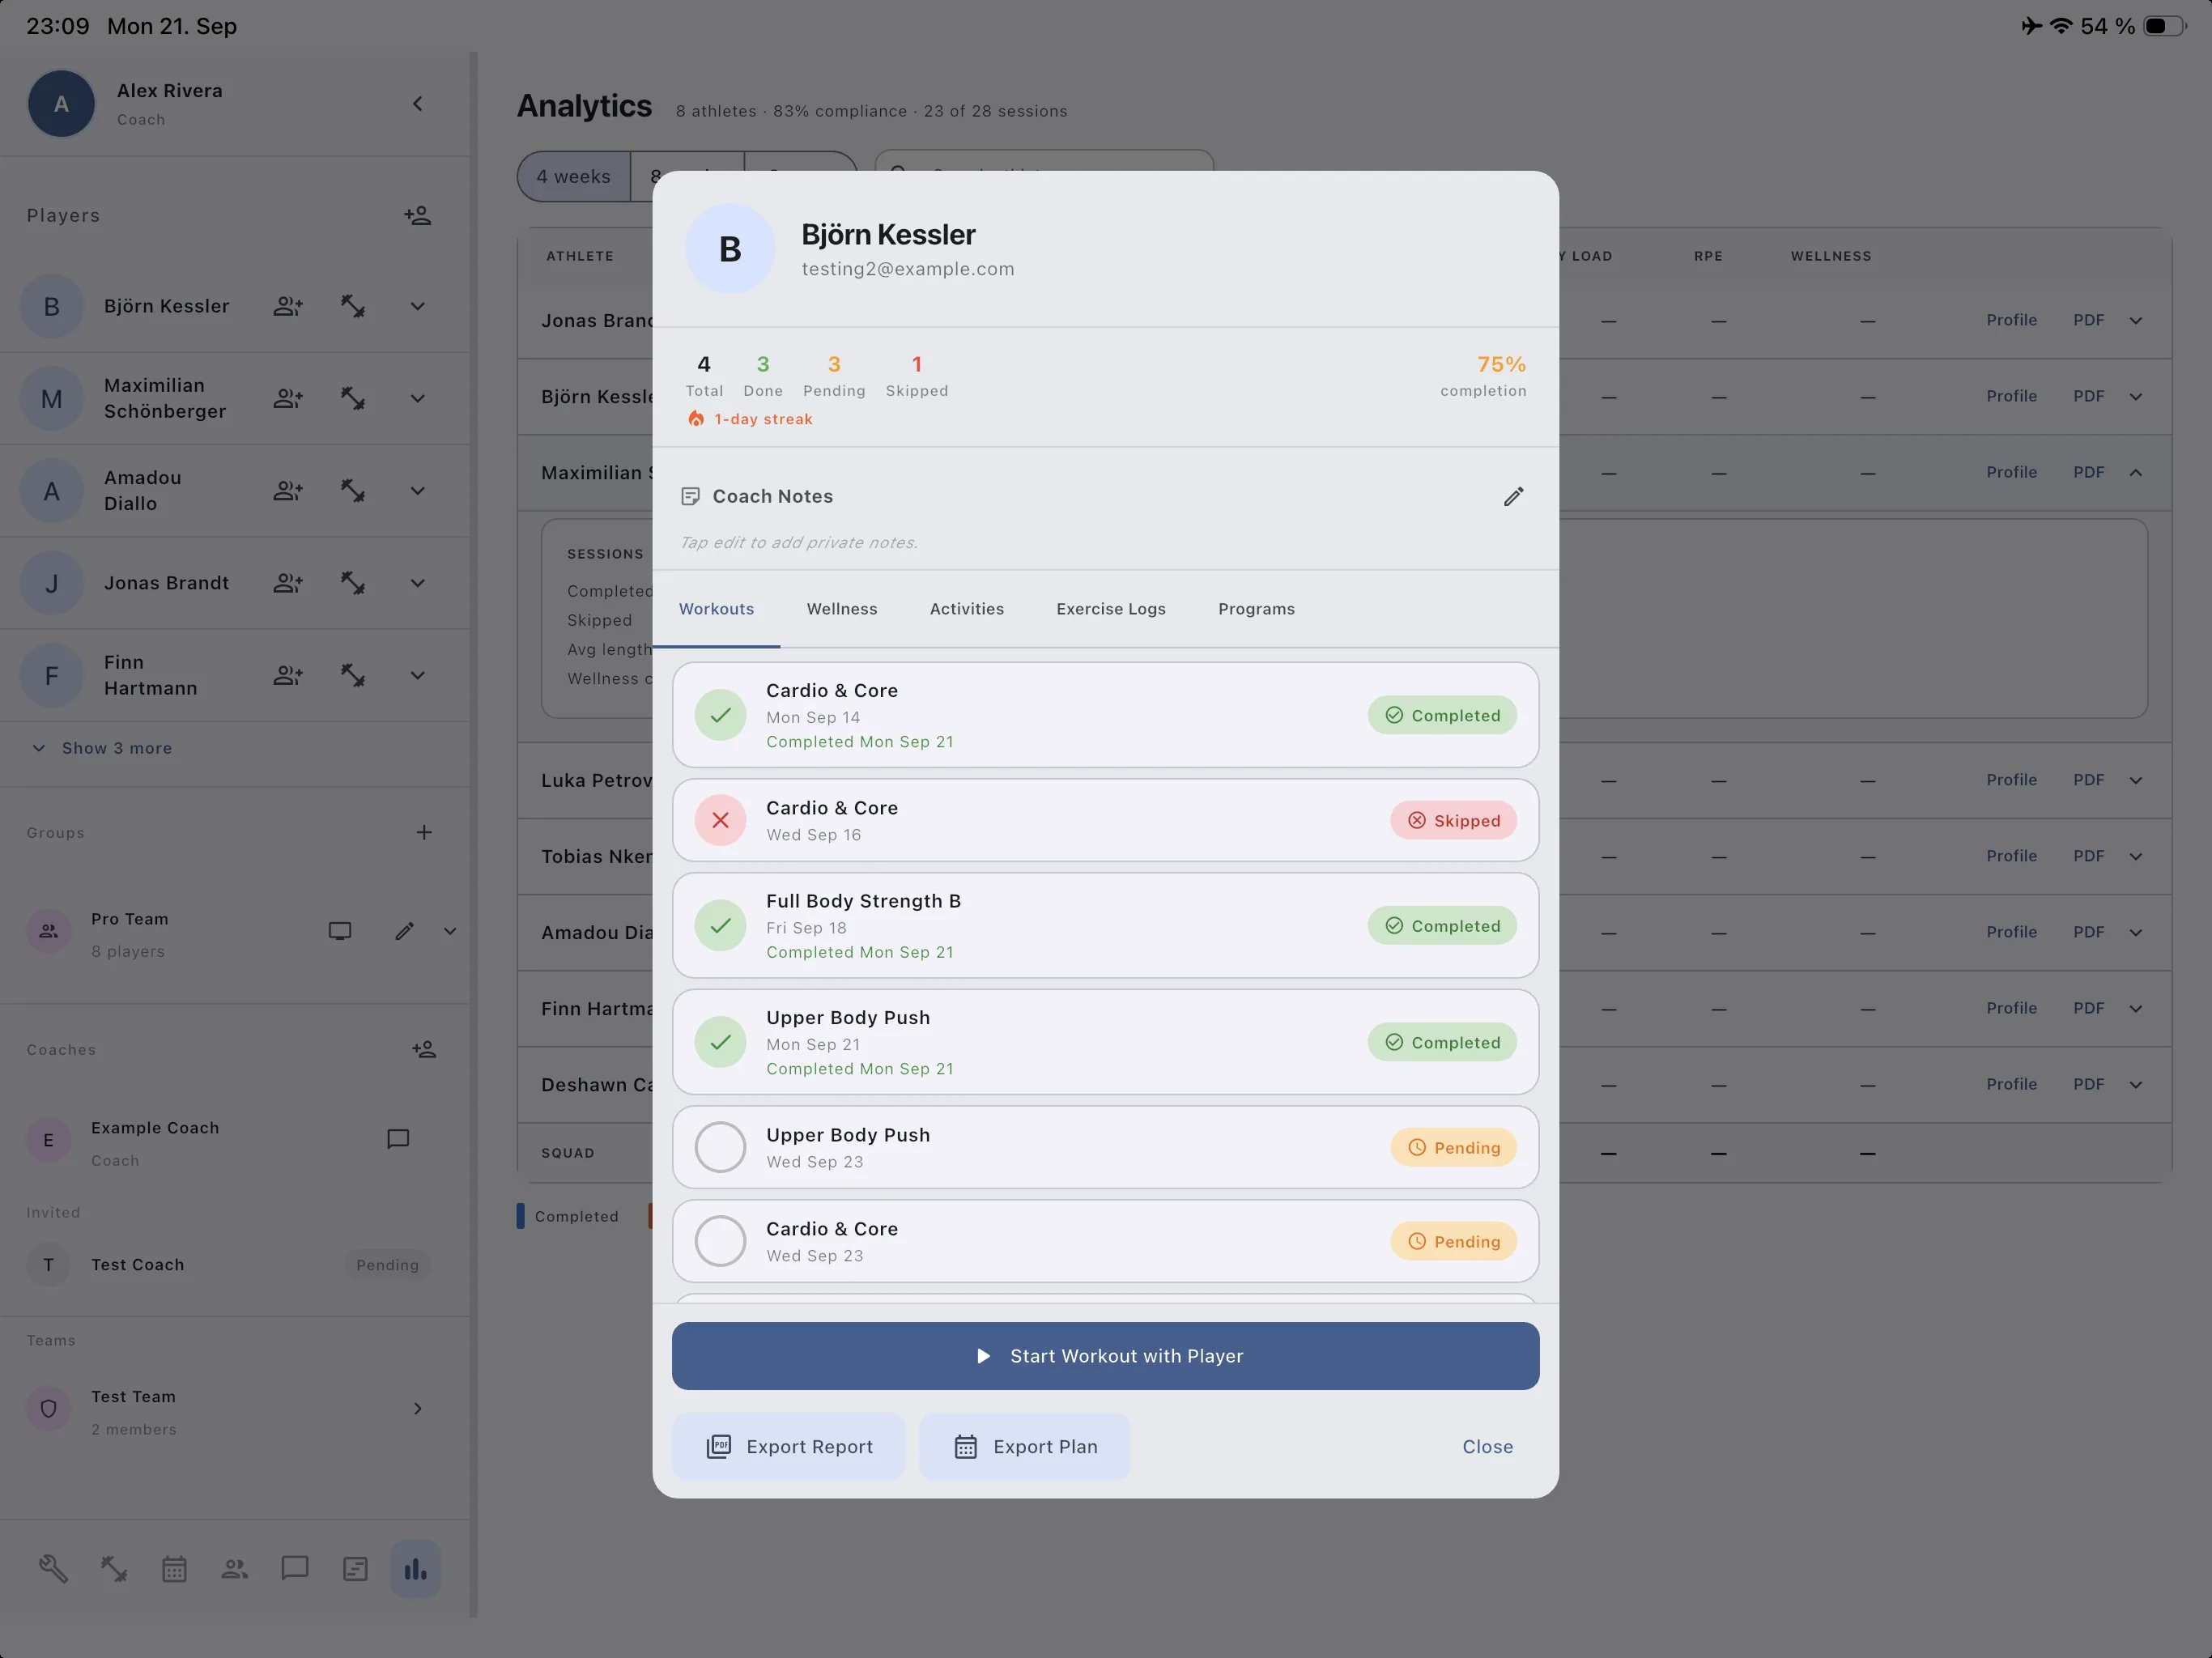
See a player's overall stats — total, done, pending, skipped, completion %, and current streak
Browse five tabs: Workouts, Wellness, Activities, Exercise Logs, and Programs
Read through their full workout history with completion status (Completed, Skipped, Pending) and completion dates
Write private coach notes that only you can see
Start an in-person session together — Start Workout with Player lets you log their performance live from your own device
Export a PDF training report or a printable training plan separately
Step-by-step
1
Open a player profileClick any player's name in the left-hand Players panel, or tap the arrow icon on a row in Analytics. The profile opens as a modal.
2
Review their statsThe top of the profile shows total workouts, done, pending, and skipped counts, their current streak, and overall completion %.
3
Browse the tabsSwitch between Workouts (assigned session history), Wellness (check-ins), Activities (self-logged training), Exercise Logs (per-exercise performance), and Programs (assigned training blocks).
4
Add coach notesTap the edit icon next to Coach Notes to jot down anything relevant — injury concerns, motivation notes, technique cues. These are private to you.
5
Run a session togetherTap Start Workout with Player when you're training with them in person — log their sets, reps, and RPE live from your own device as they go.
6
ExportUse Export Report for a PDF covering recent compliance, RPE, and streak, or Export Plan for a printable copy of their upcoming schedule.
💡
Tip: Use the Wellness tab inside the profile to see the player's sleep, soreness, and stress check-ins over time — this context is invaluable when RPE scores are unusually high or low.
12
Training Reports
Export a clean, printable PDF summary for any athlete — ideal for parent reviews, club management, or athlete check-ins.
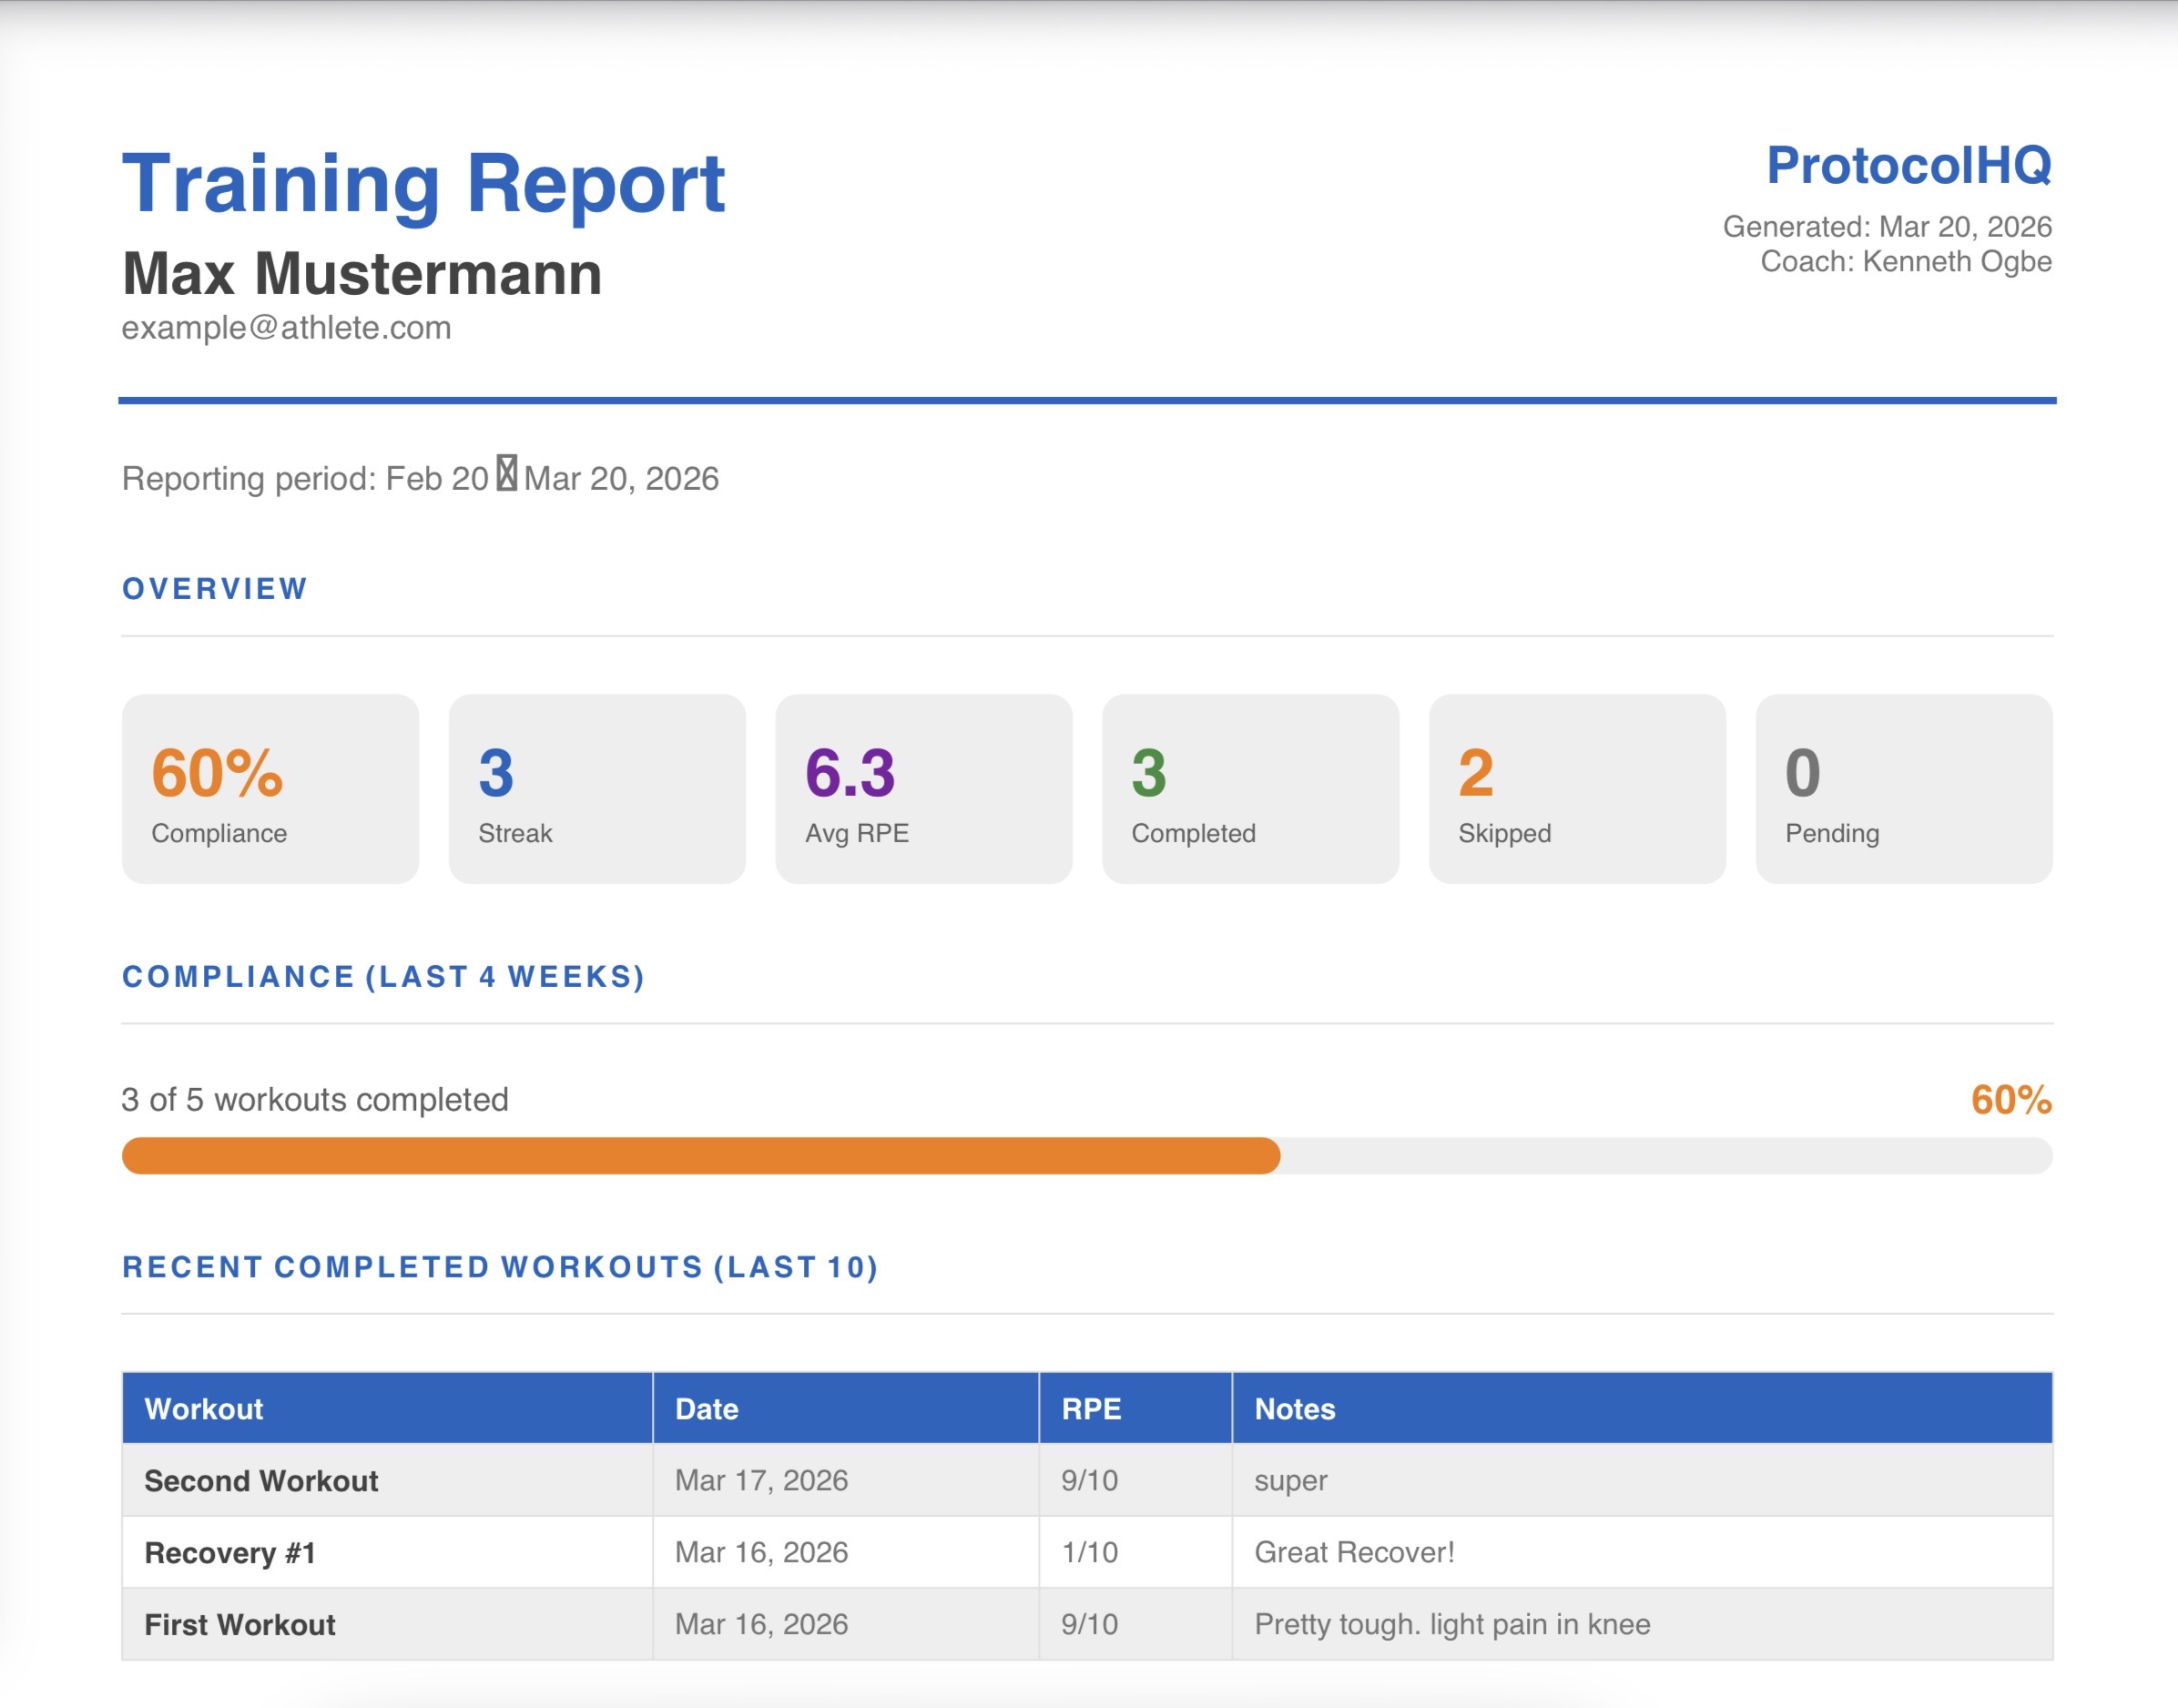
What the report includes
Reporting period (e.g. last 4 weeks)
Compliance rate, training streak, and average RPE
Counts of completed, skipped, and pending workouts
Compliance bar chart for the period
List of recent completed workouts with date, RPE, and athlete notes
How to generate a report
1
Open the player's profileClick on any player in the Players panel on the left side of the dashboard, or via the Analytics panel.
2
Tap Export ReportScroll to the bottom of the profile panel and click Export Report. The report is generated instantly in the browser.
3
Save or printThe PDF opens in a new tab. Use your browser's print or save dialog to download it. It's formatted to look clean on both screen and paper.
💡
Tip: Send the report directly to athletes or parents after a training block ends. It's a powerful way to show progress and keep everyone aligned on training goals.
Athlete App
The mobile app — everything athletes need on their phone.
13
Today's Training
The first screen athletes see — their workout for today, instantly visible.
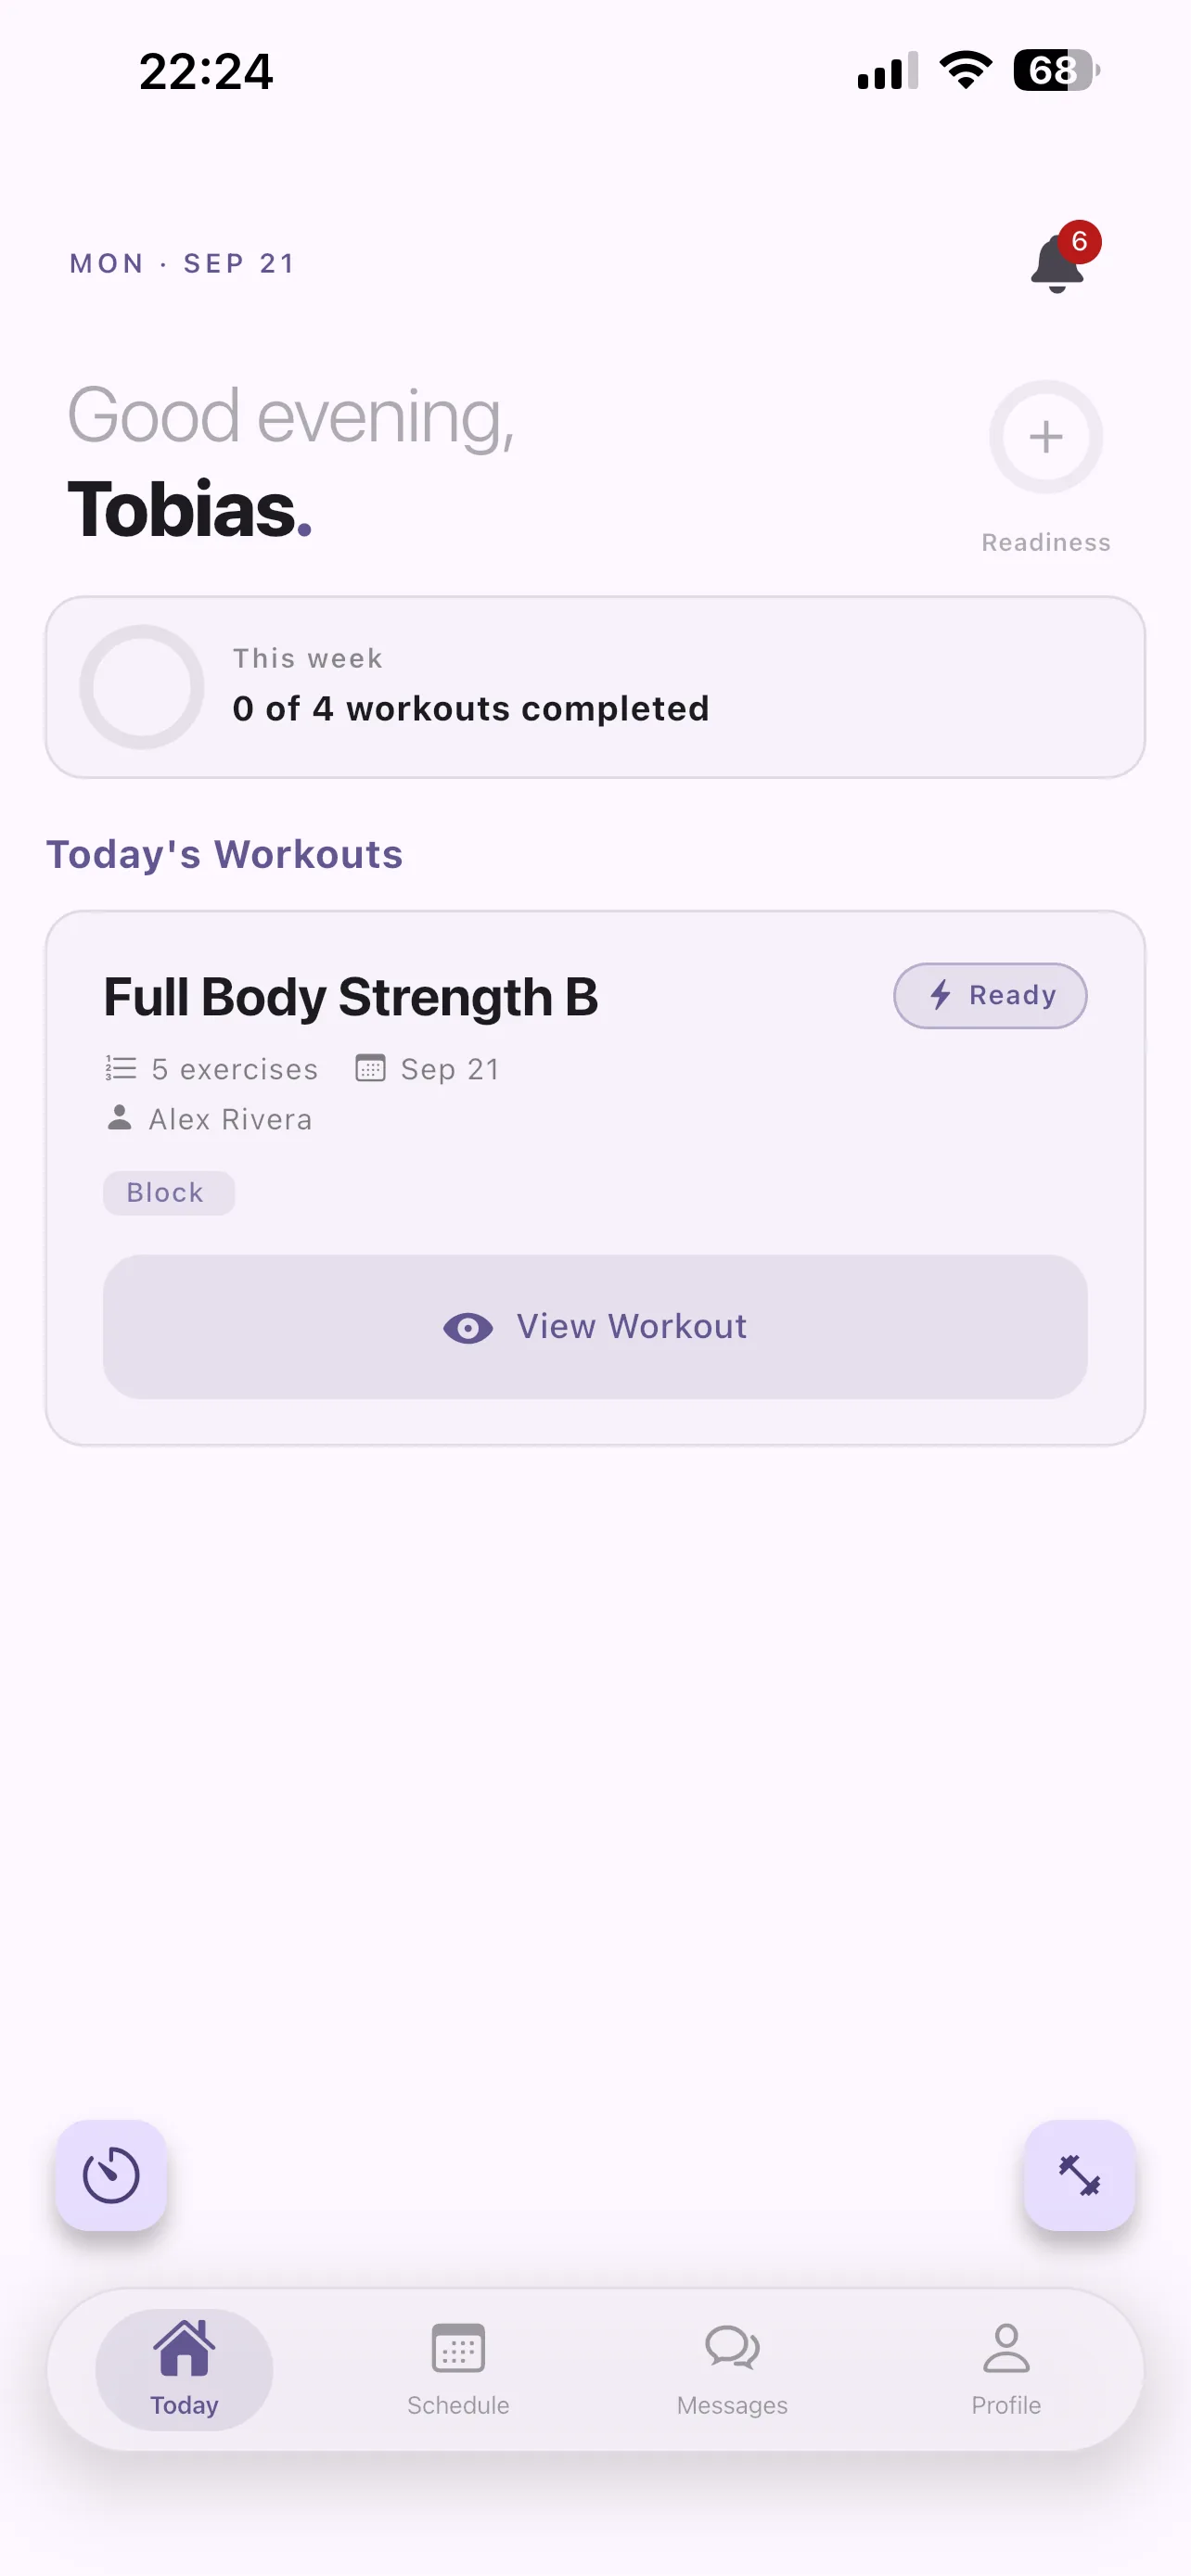
What athletes see here
Their coach-assigned workout for today — name, exercise count, and block structure
A Ready or Completed status badge on each workout
The coach's name who assigned the workout
A View Workout button to preview or start the session
A notification bell for new workout assignments or coach messages
How athletes use this screen
1
Open the appThe Today tab loads automatically. If there's a workout scheduled for today, it appears as a card with the workout name and details.
2
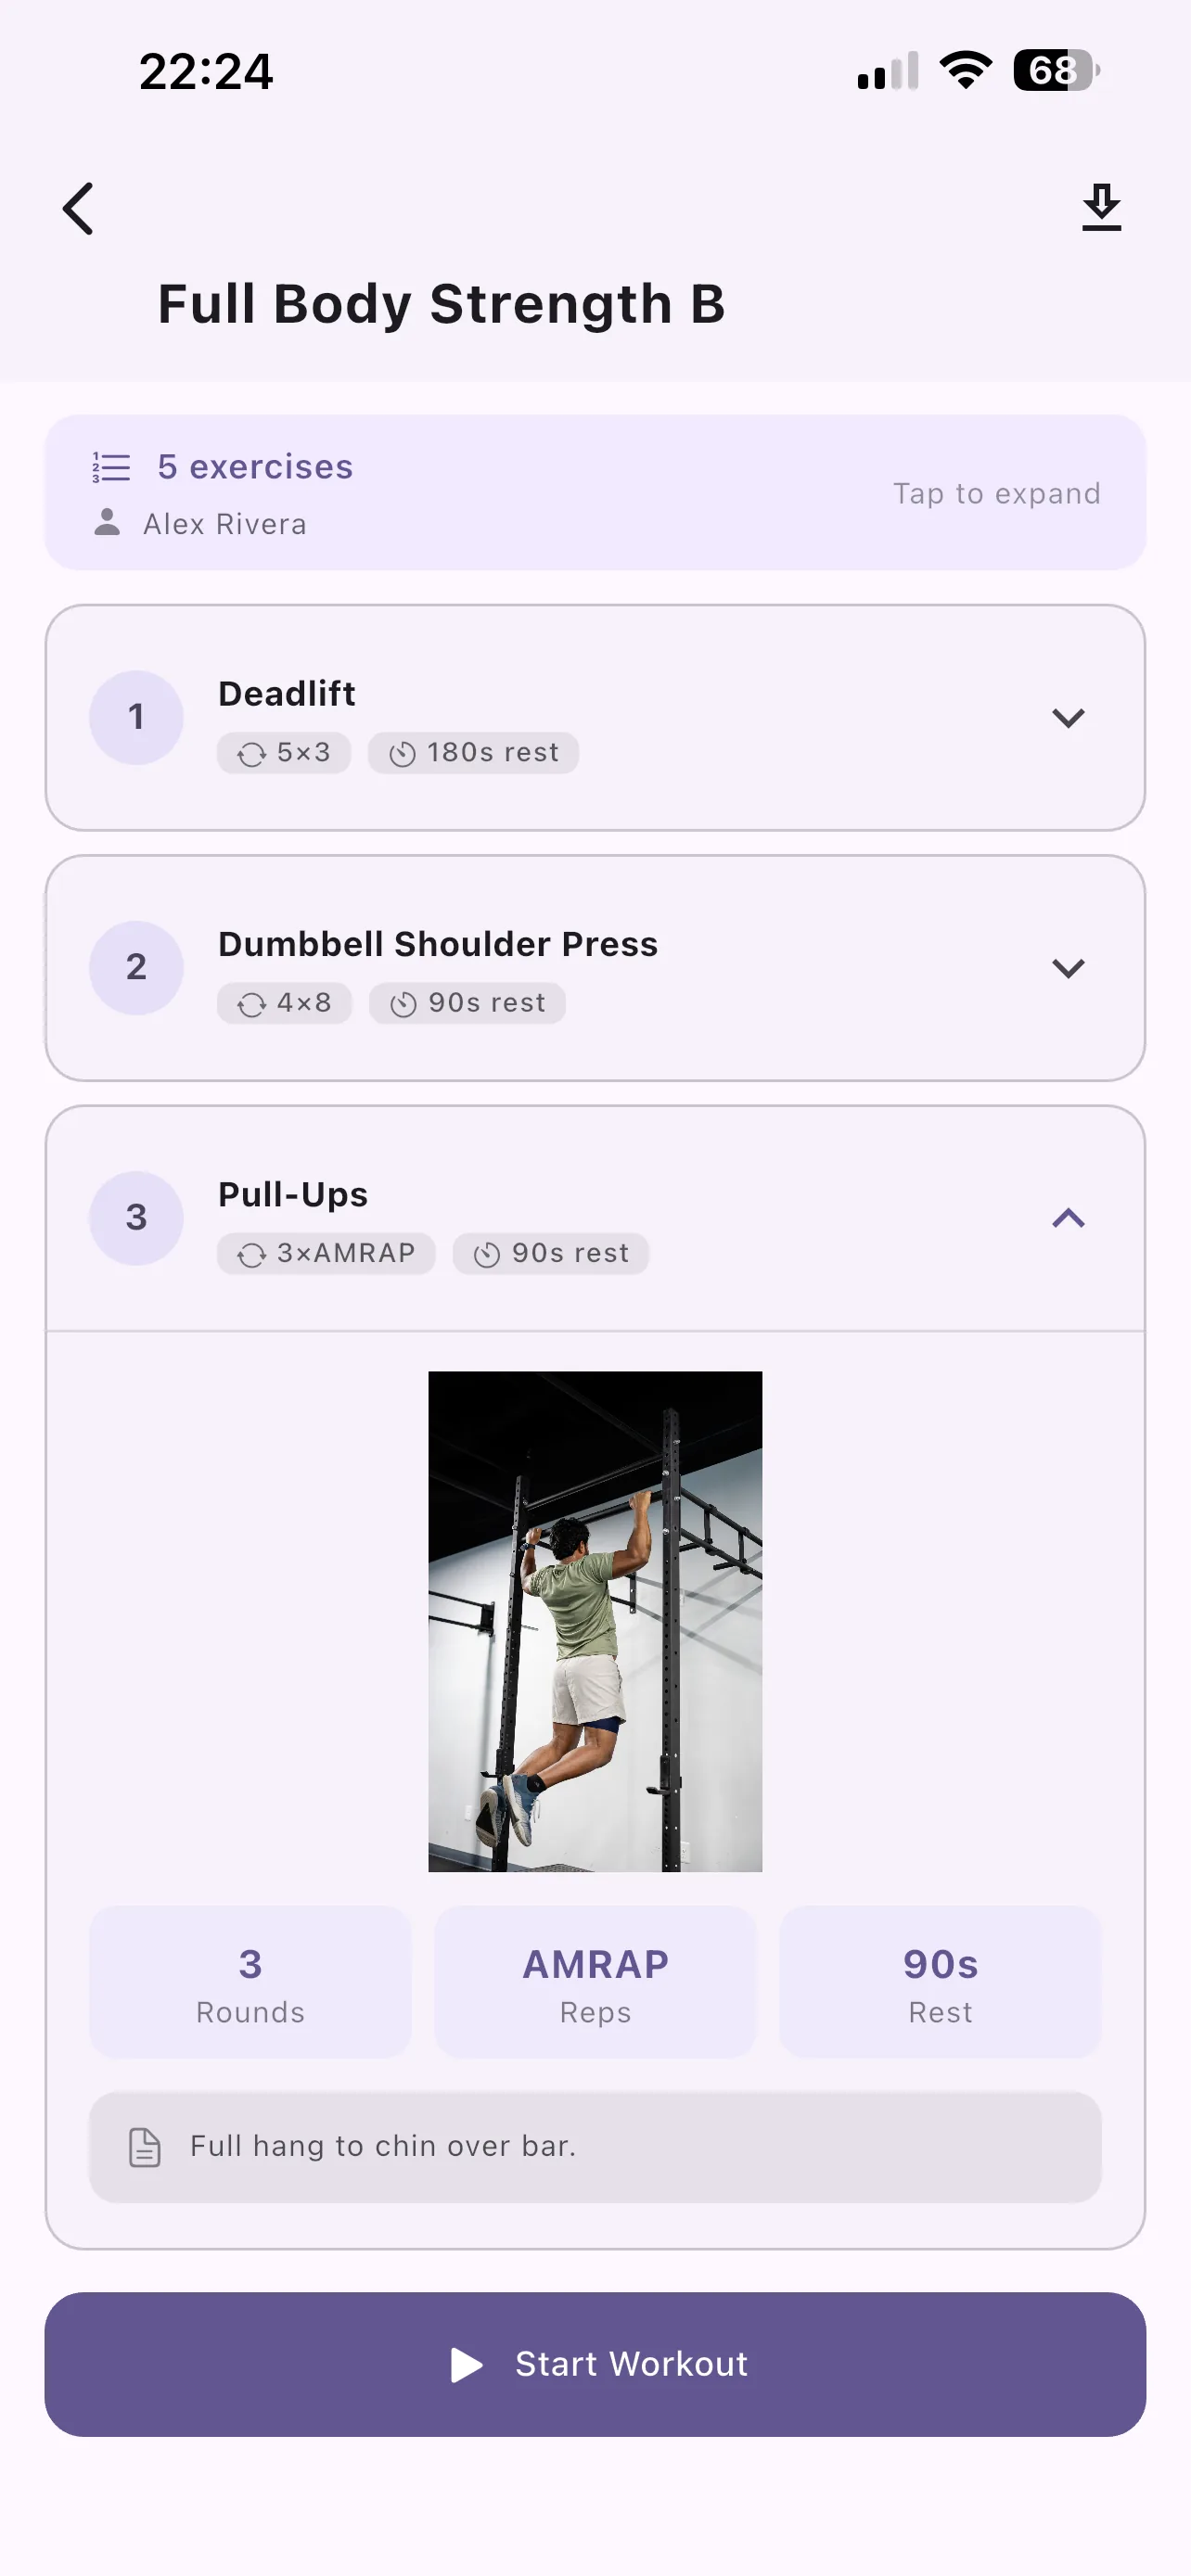
Tap View WorkoutThis opens the workout detail screen showing every exercise grouped by block, with sets, reps, and rest information.
3
Start and complete the workoutTap Start Workout to begin. Log weight, reps, and RPE per exercise as they go. When finished, the card updates to Completed.
💡
Tip: The app works offline. Athletes can view and complete workouts without an internet connection — data syncs to the coach dashboard when they reconnect.
14
Schedule
A week-and-month calendar of all upcoming and past sessions.
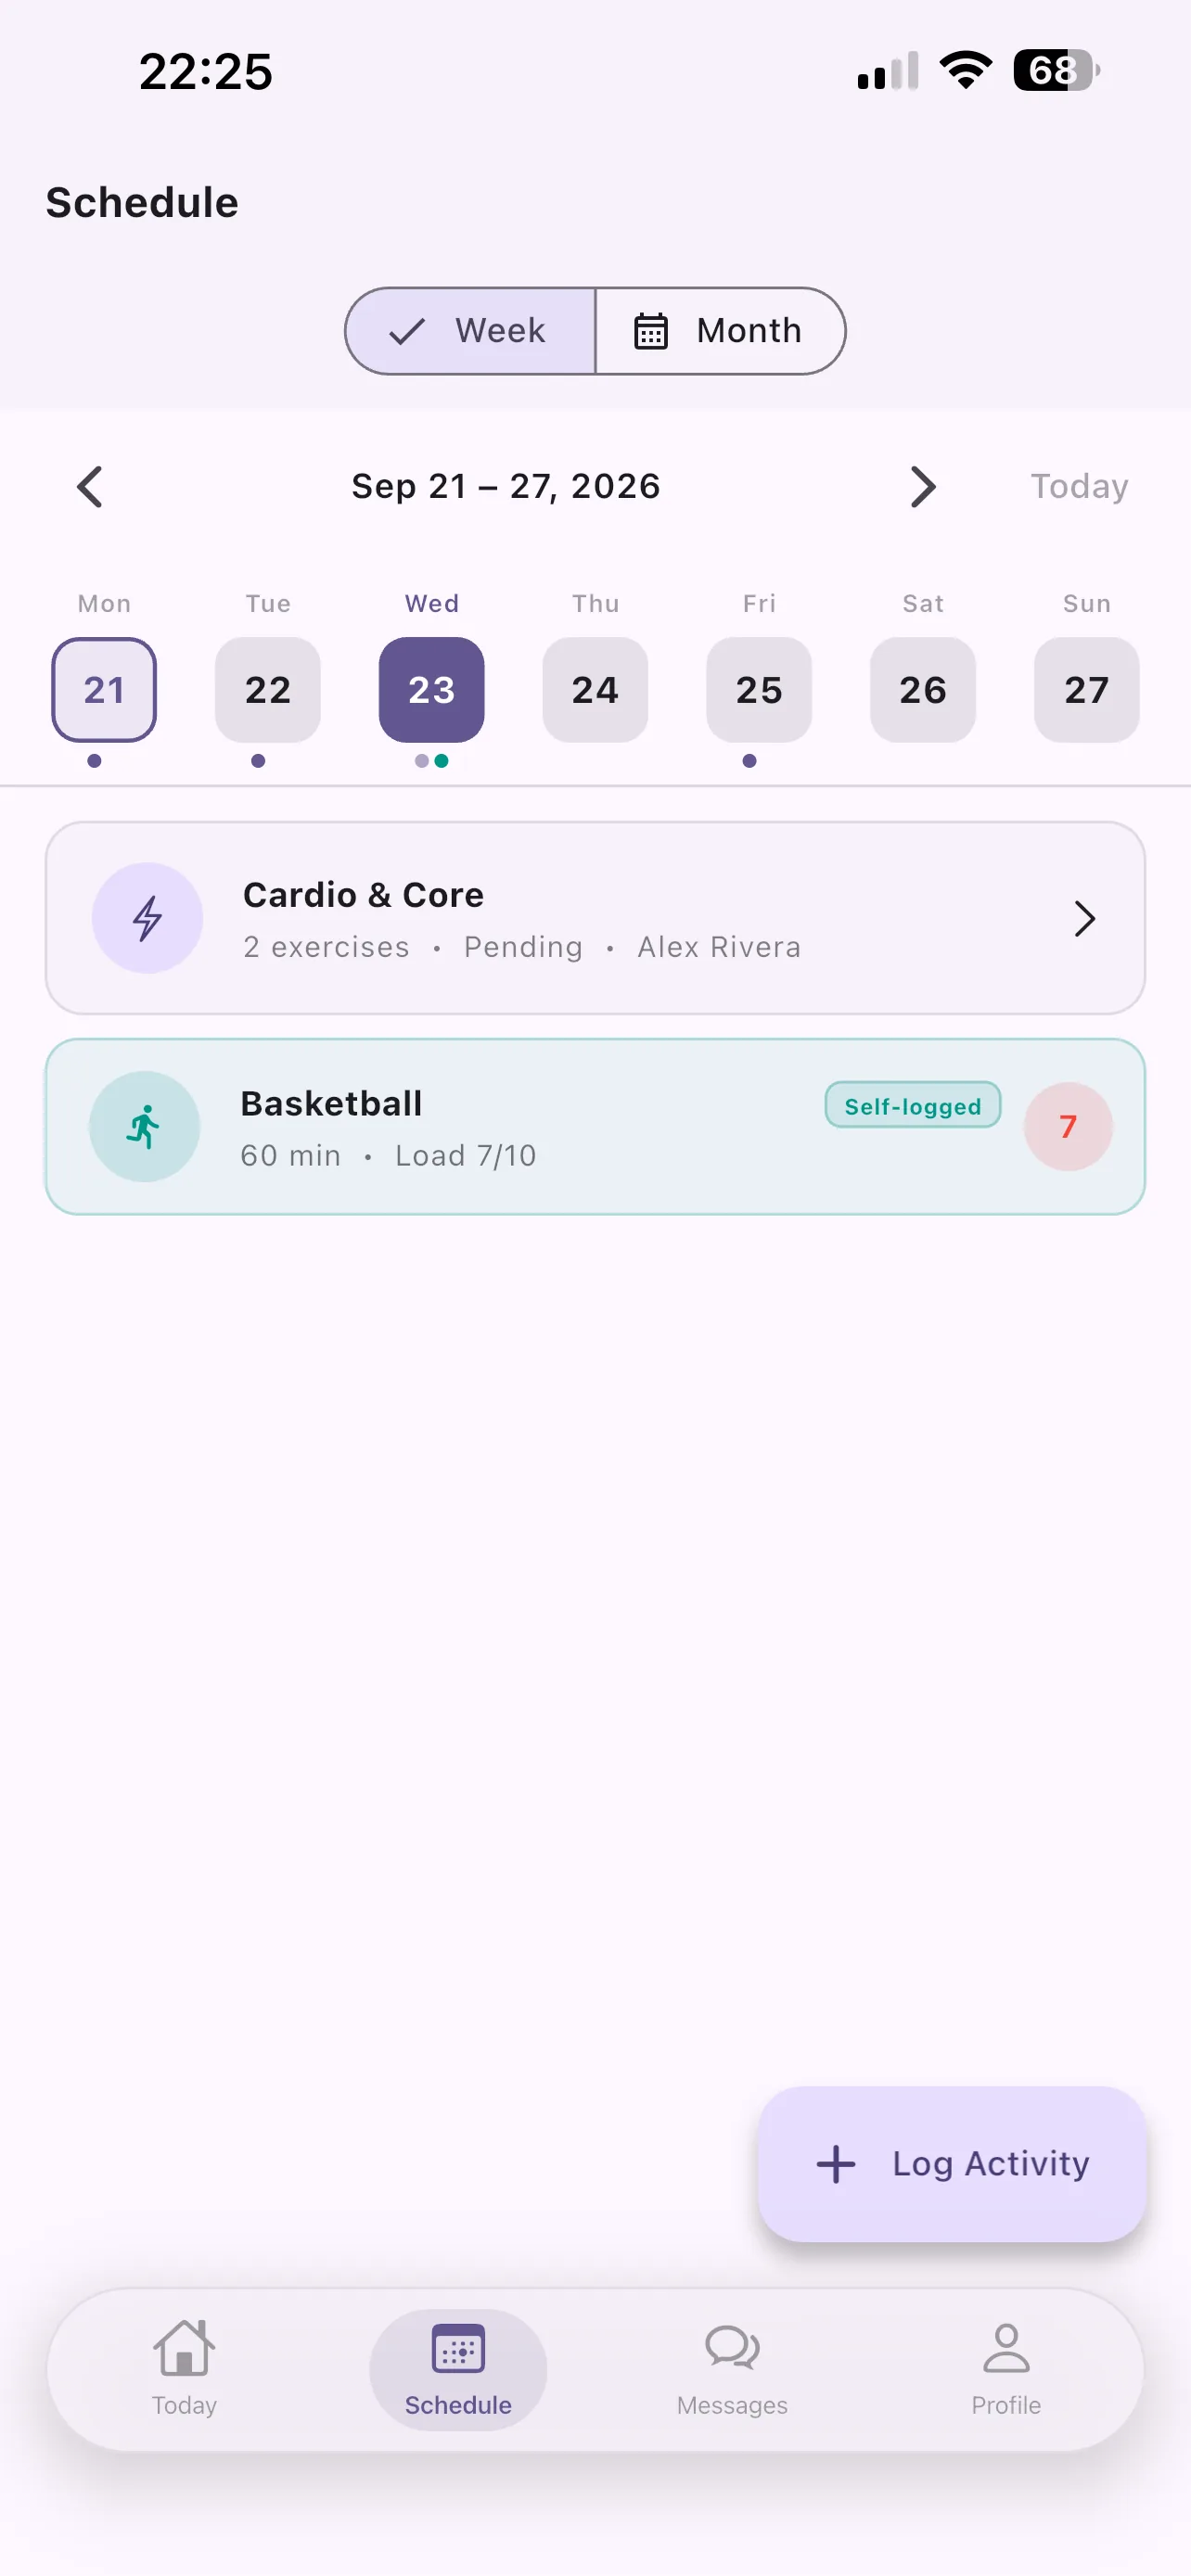
What athletes see here
A weekly strip calendar — green dots show days with assigned workouts
Tap any day to see that day's workout listed below the calendar
Switch to Month View for a full calendar overview
A + Log Activity FAB to add self-tracked activities (runs, sports, etc.)
Workout cards show name, exercise count, status, and coach name
Logging a self-activity
1
Tap + Log ActivityThe button appears at the bottom right. A sheet opens for the athlete to enter an activity name, date, duration (minutes), and load level (1–10).
2
Submit the activityThe self-logged activity appears on the calendar and is visible to the coach in the Analytics and Player Profile screens.
💡
Tip: Encourage athletes to log their own activities even on rest days. This gives coaches a more complete picture of total training load and recovery.
15
Running a Workout
The step-by-step workout view — every exercise, set, and coaching cue in one place.
What athletes see here
All exercises grouped into blocks (Block A, Block B, Block X…)
Sets, reps, and rest time displayed for each exercise
Expand any exercise to see coaching notes and media demos
A Start Workout button at the bottom to begin the guided session
Workout duration is tracked from the moment Start Workout is tapped to completion — logged automatically with the session
How the workout flow works
1
Review before startingScroll through all exercises to understand the session structure. Tap any exercise row to expand it and see coaching notes or a demo image/video.
2
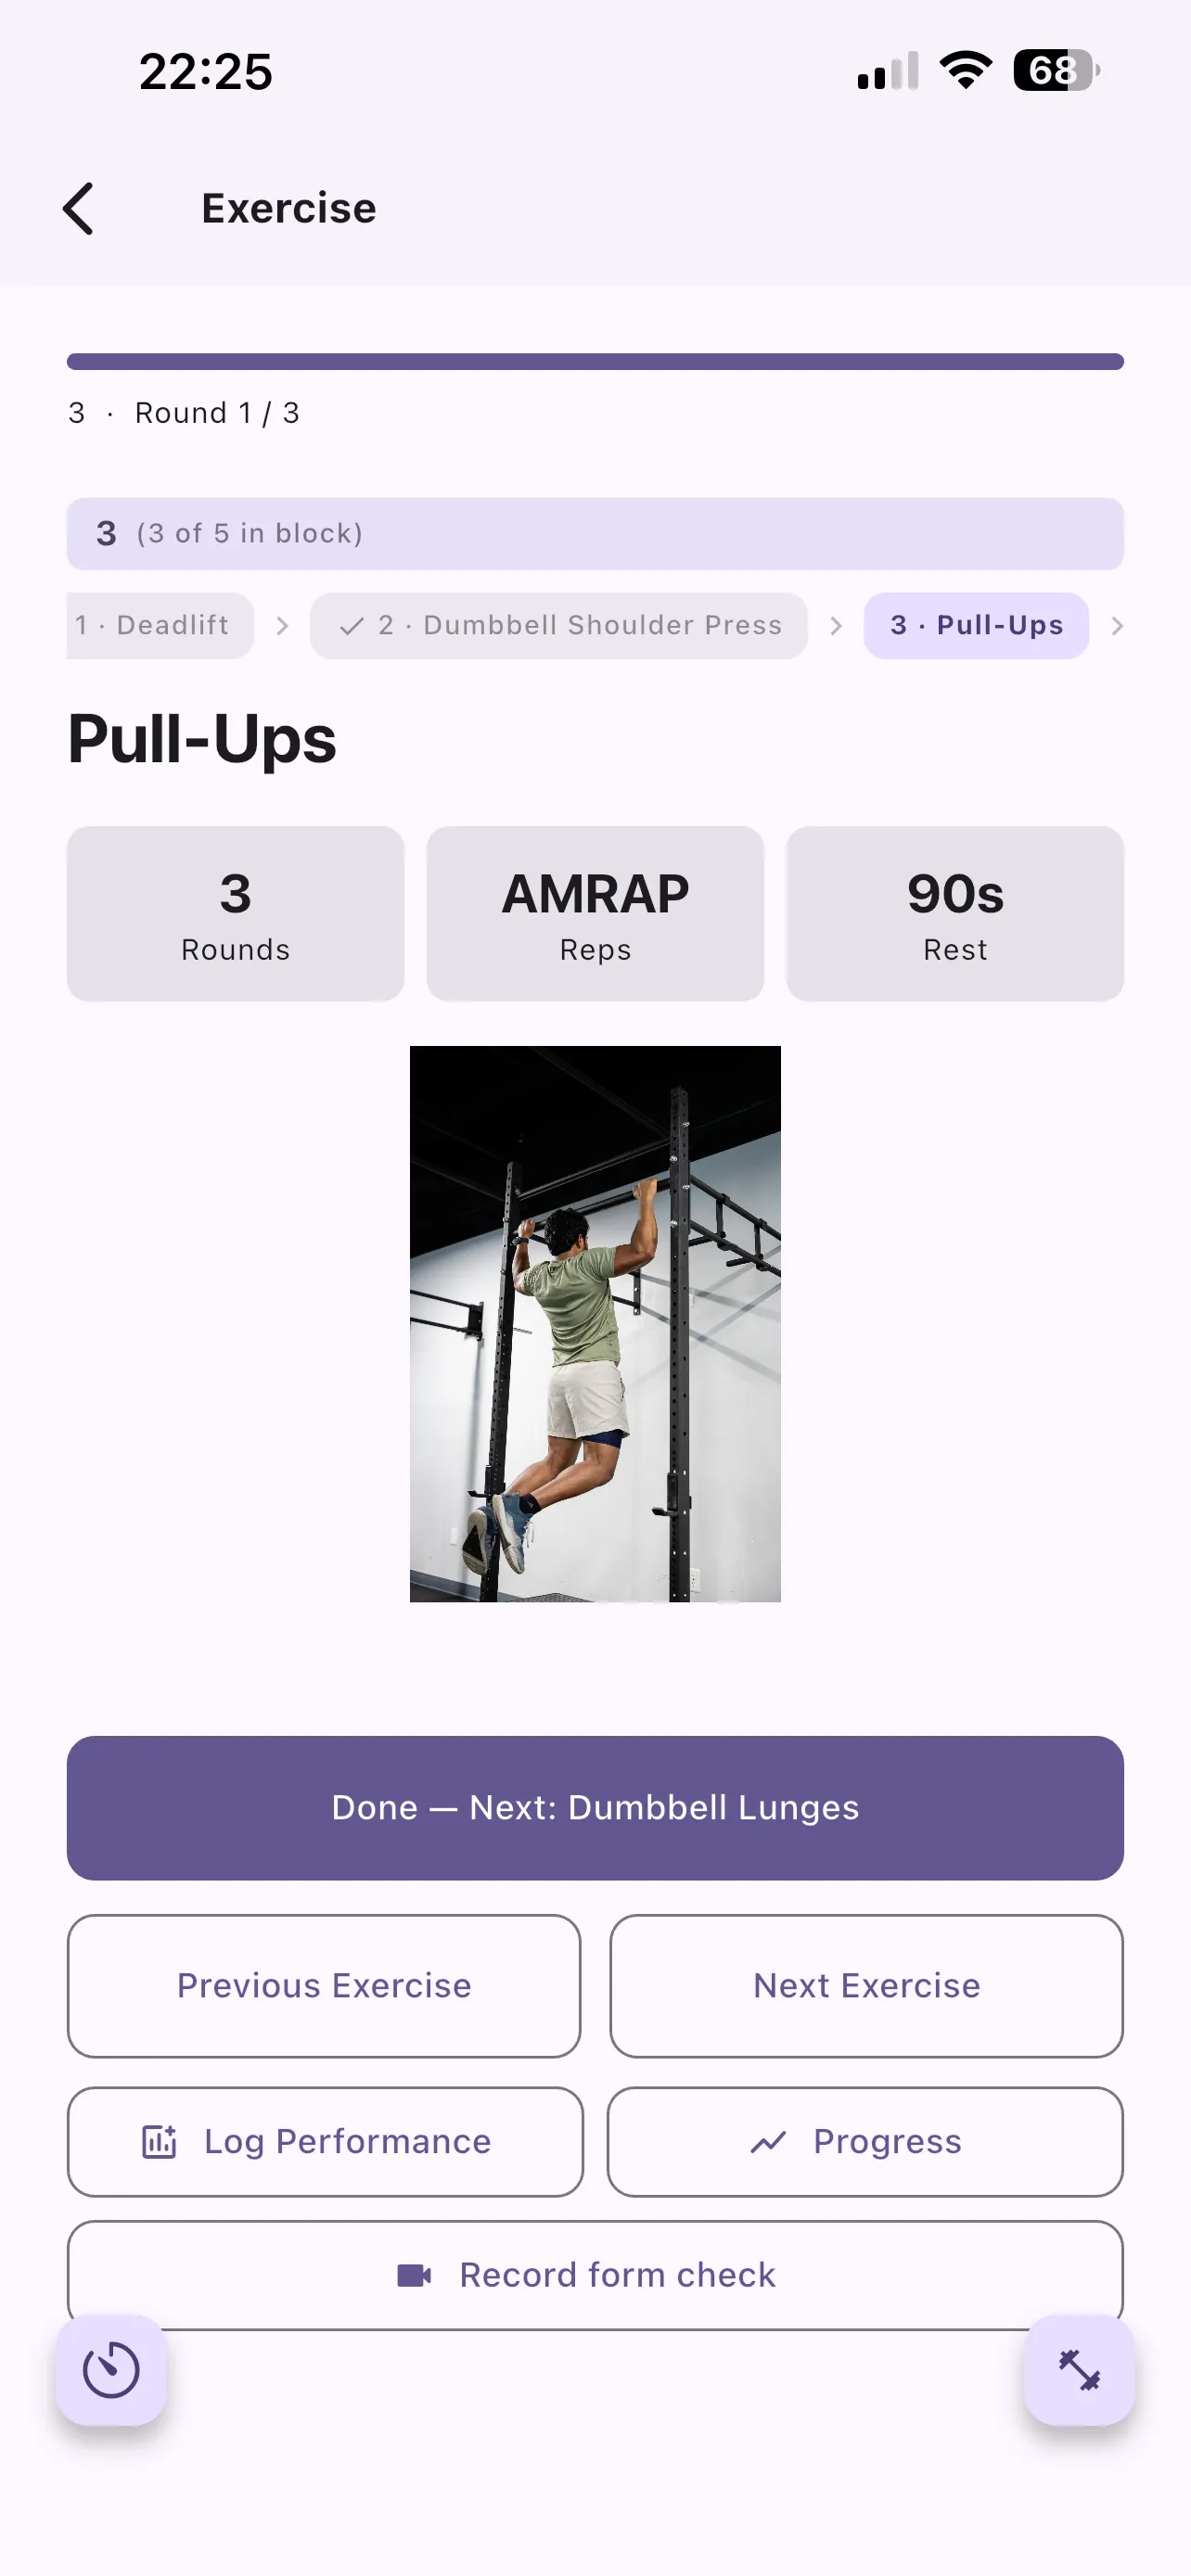
Tap Start WorkoutThe app enters guided mode, stepping through each exercise one at a time. Athletes log their actual reps, weight, and sets as they go.
3
Rate the session (RPE)At the end of the workout, athletes rate the session difficulty on a 1–10 RPE scale. This is logged and visible to the coach immediately.
4
Session marked completeThe workout status updates to Completed across the app and the coach dashboard. The athlete's streak and completion rate update in real time.
💡
Tip: Athletes can add a short note when completing a workout (e.g. "felt strong today" or "light pain in knee"). Coaches see these notes in the Player Profile history.
16
Form Checks
Record a quick clip of any exercise and send it straight to your coach for feedback.
What athletes see here
A Record form check button on any exercise's step screen, right next to Log Performance and Progress
Recording happens right where the athlete is already executing the exercise — no need to leave the workout flow
Clips are saved to that exercise and automatically shared with the athlete's coach(es) for review
Step-by-step
1
Open an exercise during a workoutFrom the guided workout flow, the current exercise's detail screen is shown with its sets, reps, and rest info.
2
Tap Record form checkFilm a short clip showing the movement, right from that screen.
3
Send for reviewThe clip uploads and is instantly visible to the athlete's coach(es) for feedback.
💡
Tip: Encourage athletes to record a form check the first time they try a new or heavy lift — a short clip is often enough for a coach to spot and correct a technique issue before it becomes a habit.
 ProtocolHQ